
In this tutorial I will teach you how to do interwoven crochet (or also called locking filet crochet) in squares, and with that I mean working in the round, so not from bottom to top. It is necessary that you already know how to do interwoven crochet. You can learn all about it on the pages on the HAL CAL menu or here for the very first start (click here). You will find the phototutorials there and the links to the accompanying videos.
I will use the American crochet terminology in these pages.
A new extensive tutorial!
 Hereafter follows the tutorial I made in 2019 for interwoven squares that are crocheted in the round. At the start of 2023 I made a new tutorial for the Hooked and Locked CAL 2023, that is made entirely of blocks that are crocheted in the round, and this is a very elaborate tutorial. All situations that you can think of for the setup and the first couple of rows are covered in it. I don’t have a photo tutorial there like here, so my advice is to do the following tutorial first to get a grip on what you have to do, but after that please watch the videos of the practice piece of the HAL CAL 2023! Some things might just be a little more handy for you. Here is the link to the page of the practice piece: click here. It also has a lot of free downloadable patterns with it.
A tiny thing has changed
In the tutorial here I mention rows 1, 2, 3, 4 and 5. In the new tutorial this has become row 1a, 1b (was 2), 2a (was 3), 2b (was 4) and 3a (was 5). This is to indicate with which color to crochet the row: the a-rows with color 1, the b-rows with color 2. Makes it just a bit easier 🙂 .
Pages of this tutorial
I splitted the tutorial up in several pages.
- Introduction and row 0 and row 1: that’s this page
- Row 2: click here to go to that page
- Row 3: click here to go to that page
- Row 4: click here to go to that page
- Row 5: click here to go to that page
- Row 6 and 7: click here to go to that page
- Pattern description and pictures of the last rows: click here to go to that page
- Tips and tricks: click here to go to that page
- Joining the blocks: click here to go to that page
Videos
I made a couple of videos again for this tutorial. Click in the list here or look at the end of this page:
- video 1: Introduction, setup and rows 1 and 2 (https://youtu.be/074d7qQvHQU)
- video 2: Rows 3 through 5 and color changes (https://youtu.be/N6IpHC8RZAE)
- video 3: Joining the blocks with the flat join (https://youtu.be/1GAZZWCFkvw)
Pay attention: I do not have a tutorial here on the website for the color changes! Watch video 2 for this!
Why in the round?
1. Join as you go
Well, of course you can do a square pattern for interwoven crochet in the ‘regular’ way, from bottom to the top. If you make several blocks, you can crochet a border around them, and attach them to each other. But if you want to join them right away, like you can with granny square blocks, on the go, you can do that right away if you do them in a circular way.
2. Playing with color changes
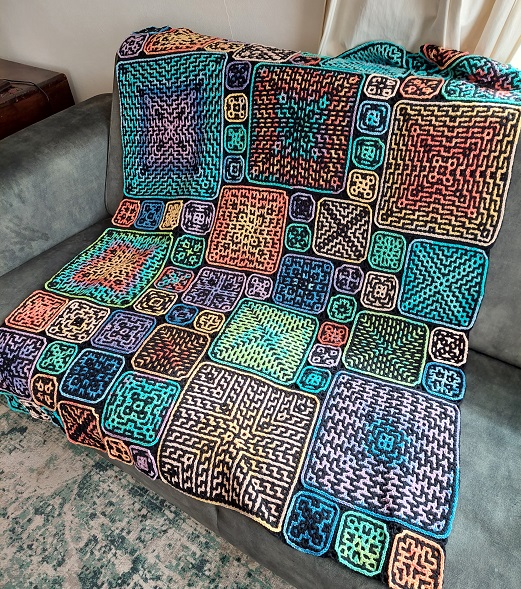
You can play with color changes differently than working a pattern from bottom to top. You can use a variegated yarn, but if you use balls in several colors (see video 2 and the picture here), you can get very fun effects. So, just a bit different.
3. Playing with front and back
Something you can also do with this, is placing one block with the front facing you and another block with the back facing you. Okay, with a lot of interwoven crochet patterns you don’t have a real front or back (unless you have pictorial patterns), but you know what I mean 🙂 . You can really vary this in different ways.
4. Choose your border
If you have a pattern for interwoven crochet, the outer border is always in color 1. If you now crochet a pattern in the round, you could decide to stop at a point with a border that’s in color 2.
5. Using your scraps
And what you can also do: using your scraps! If you make blocks in several color combinations you can make a very fun colorful project. And you can also do that by using several colors per block.
Enough reasons to try this. It just needs a little bit attention how to do it, but with the following tutorial you will manage!.
A point of attention when choosing patterns
Actually this is also the case for regular interwoven crochet patterns, but if you will find patterns on the internet that you want to use in this way, then please pay attention to the border pattern. See if there’s enough ‘front-back interaction’, so that you do not have layers that are all loose. If you have done interwoven crochet before, you know that you can have places in your pattern where one or more rows are kind of loose from each other. With a good pattern that issue resolves itself later in the pattern, when there is again enough ‘front-back interaction’, where the layers come together again. If you now have several blocks you will attach to each other, you will do this with the last row of crochet stitches. If the row before that with the other color is all loose, you cannot attach the layers any longer (unless you find a fancy way for it). So please keep that in mind!
The tutorial

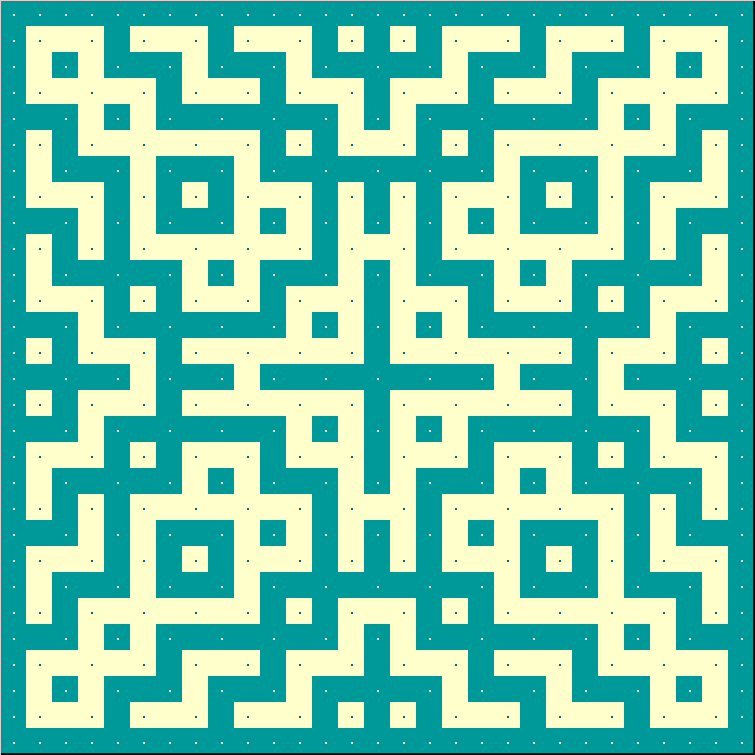
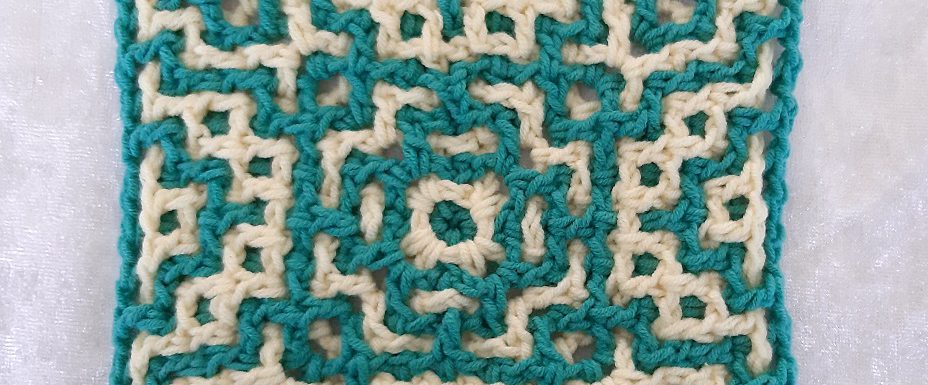
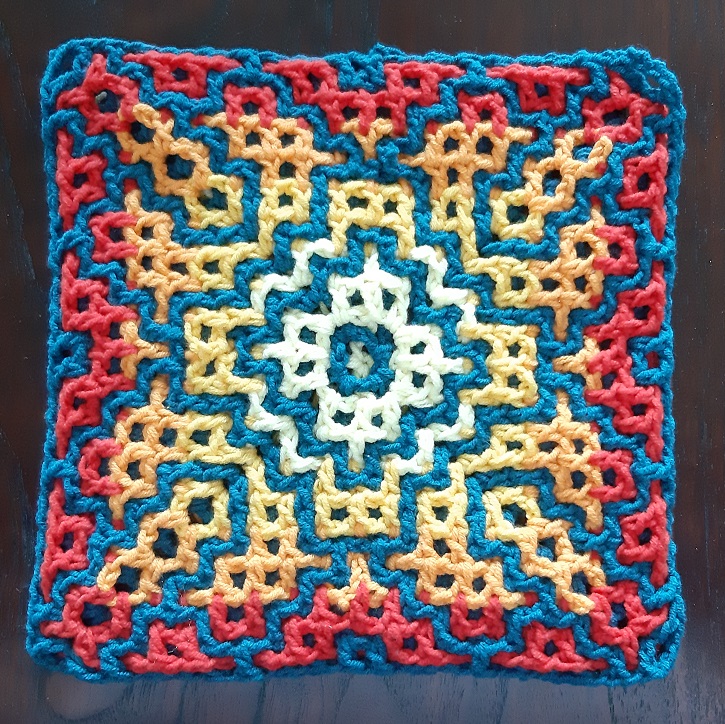
I will explain the steps using this pattern. Click on the pictures to see it in full and to download it.
The green is color 1, the yellow color 2. If you get confused which is color 1 or 2, just look at the center: that’s color 1.
I will do this by showing this in graphics, with the crochet symbols as well at the start, with pictures and explaining and written instructions. Next to that I will also learn you how I use my shortened pattern descriptions.
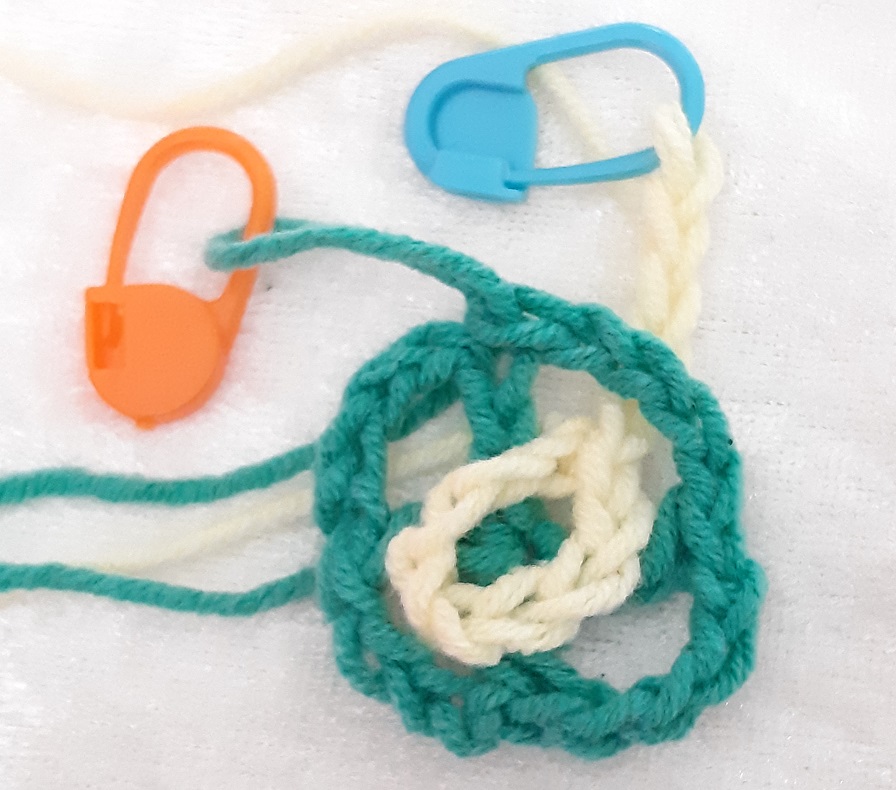
Step 1: the middle square, row 0 (color 2, yellow)
Pattern description: crochet 8 chains

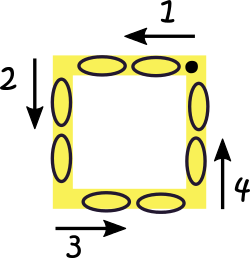
The start, that I call row 0, is always a circle first. It will become a square in the end. You simply crochet 8 chains and make it a circle by closing it with a slip stitch.
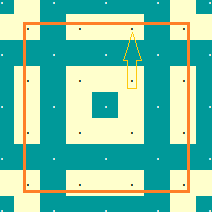
If you look at the pattern chart, you might wonder why you do not start with the little green point in the centre. This will get clear in a moment!
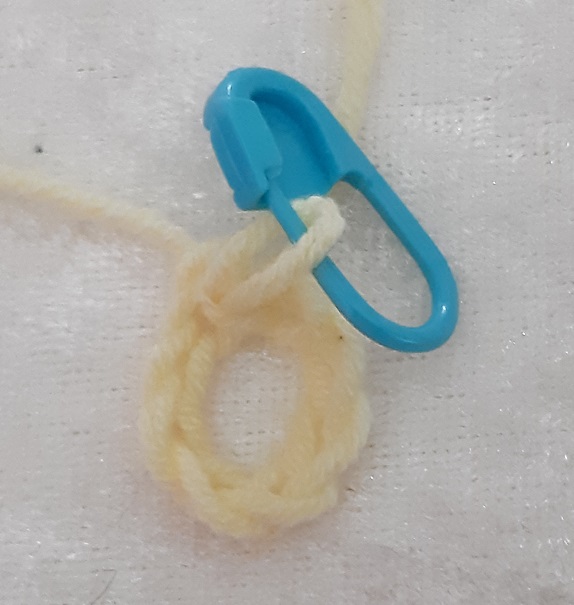
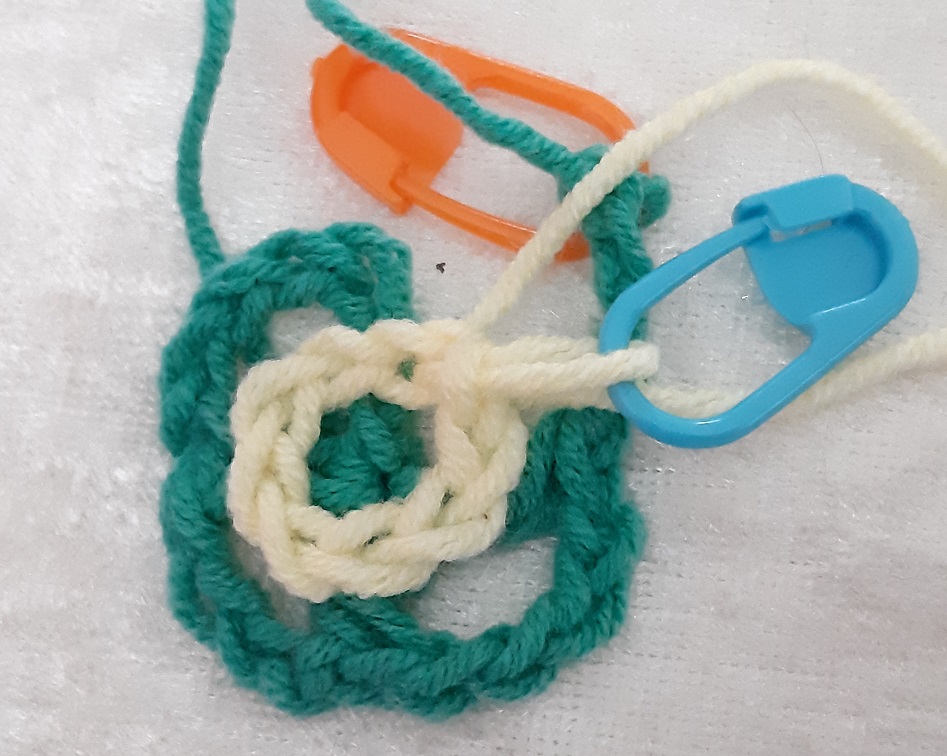
This is what it looks like when you have done this. Attach a stitch marker in the loop, because we will now do the other color.
Step 2: row 1 (color 1, green)

This is a graphical representation of how row 0 and row 1 will look together. You see you have 4 green squares, of which the posts all fall behind the middle square of color 2.
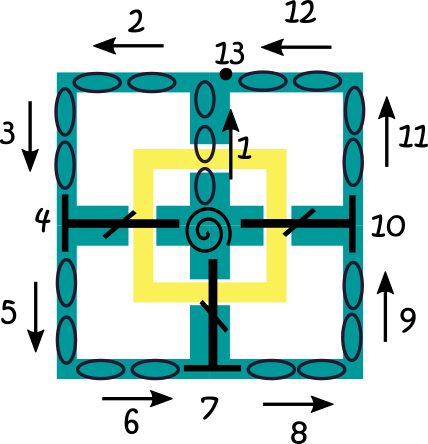
Actually you can first lay aside the middle square for a moment. You will now crochet row 1 like shown in the pattern chart here. Just forget the yellow for now.
Before we continue, I will tell how to do the corners. Each corner is made of 4 chains. Actually that’s 2 chains per side. If you will crochet double crochets in the corners, you can do this simply by crocheting into the chain space. You don’t have to insert your hook into a stitch. You can do it though if you want. Sometimes I decide to do that if I want it to look more ‘clean and crisp’.
You start with making a magic loop. Make the first 3 chains that count as the first dc (1), and then crochet the 4 corner chains (2 and 3). Make a dc in the magic loop (4) and 4 corner chains (5 and 6). Make another dc in the magic loop (7) and 4 corner chains (8 and 9). Make another dc in the magic loop (10) and 4 corner chains (11 and 12). Pull the magic loop tight. You see you have now made 4 squares.
Just wait a moment with step 13: the closing of the ‘circle’, because we have to do something special.
Here you see the result of the steps so far.
Now place row 0 on top of row 1.You will now also see that the point in the middle of the pattern is made by the place where the 4 dc’s come together in the magic circle.
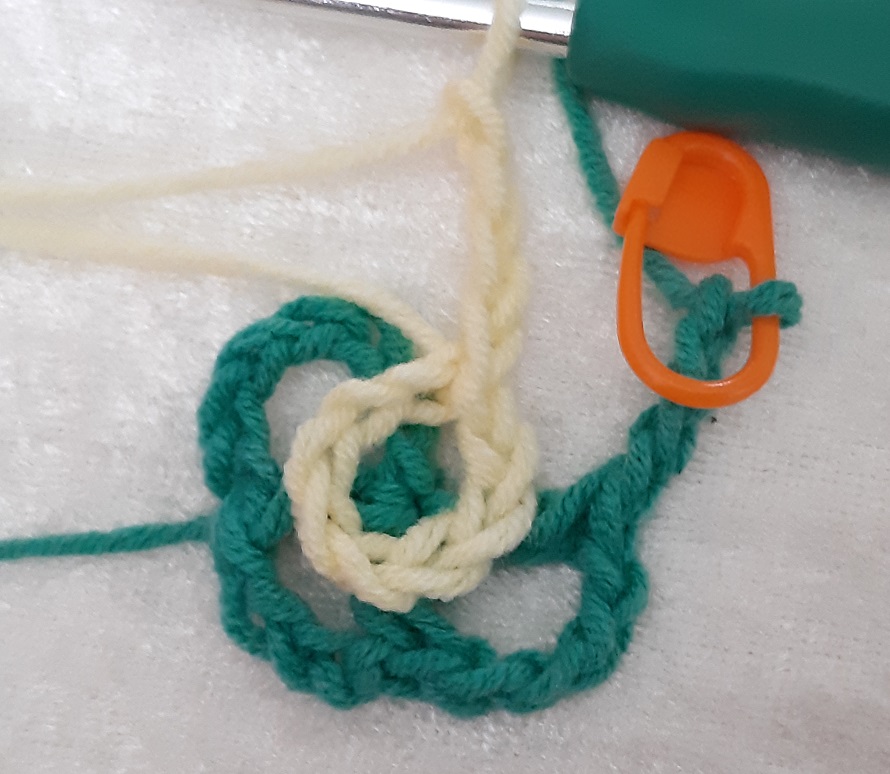
Crochet already the next 4 chains of the next row in color 2. I will explain later why this has to be 4 chains.
Now you have to decide where to put color 2. You know from regular interwoven crochet this is important for the next row.
 If you follow the written instructions that I provide with my patterns, you don’t have to think about this. Just follow the instructions. But here is the explanation.
I have marked the next row you will make in color 2 (yellow) here with orange line. Where the yellow arrow is standing is the place where you will do the first dc (the 3 chains) of the next row. You see that the yellow dc has to fall behind the green, so we have to close the ‘circle’ of row 1 over the 4 chains. Putting it differently: color 2 has to go to the back of the work.
By crocheting the first dc of the next row you can check where to put it: to the front or to the back.
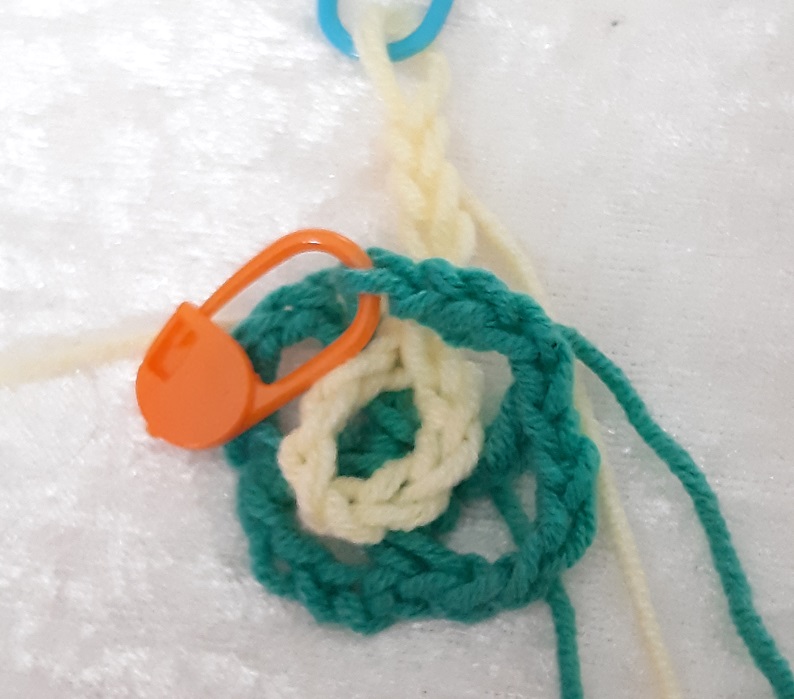
Here step 13 is done and the row is closed with a slip stitch.
Pattern description extended:
- dc in the back (3 ch)
- 4 corner ch
- repeat 3 times:
- dc in the back
- 4 corner ch
- color 2 to back
- close row with slip stitch
Pattern description shortened: *(b 1x, c)* 4x, color 2 to back (b=back, c=corner)
Click here to go to the next page of this tutorial.