
This tutorial is split up in several parts.
- page 1: introduction and explanation, that’s this page
- page 2: photo tutorial rows 1 and 2, click here to go to that page
- page 3: photo tutorial row 3, click here to go to that page
- page 4: photo tutorial row 4, click here to go to that page
- page 5: photo tutorial rows 5 and 6, click here to go to that page
What is mosaic crochet?
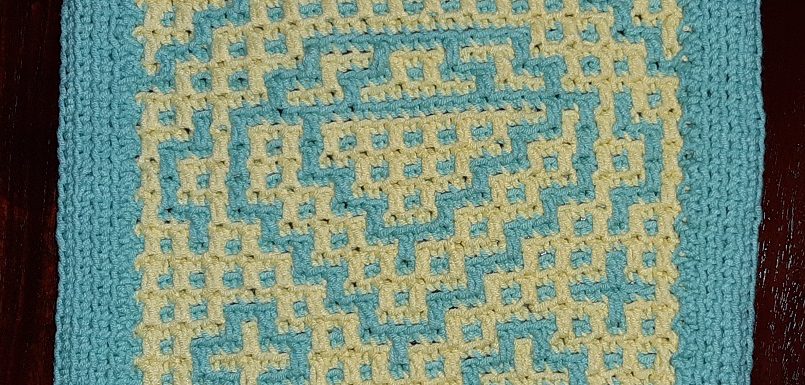
With mosaic crochet you work (as a rule) with yarns in two colors, without the need to change colors in the row that you’re working on. For most patterns you will choose colors that have a nice contrast, to make the pattern stand out. You work from a pattern chart or from written instructions. If you use the written instructions you can use the chart as a reference to check for mistakes.
With this method you will cut the yarn after every row, that’s why I call this the ‘cutting’-method. There are other methods that are also called mosaic crochet.
Mosaic crochet is actually quite simple to do. You have to be able to make a setup with chains and you must know how to make single crochets (sc) and double crochets (dc) (I use American terminology here). To be honest, it’s simpler than interwoven crochet, also a form of mosaic crochet, although that’s not very hard the moment you know how to do it. You will work alternating with the colors, so a row with color 1, a row with color 2, a row with color 1, and so on. The single crochets will always be made into the previous row, so into the row of the other color than the one you’re working with. You will always work into the top loop with the single crochets, so not under the two loops of a stitch, like with ‘regular’ crochet. You will use the front or bottom loop later. The double crochets will be made into the previous row of the same color that you’re working with. You will work into that front or bottom loop. And you always work at the front side of the piece. But I will show you this in the following photo tutorial!
The pattern
Click here to download the pattern
The video
I also made videos with instructions for the practice piece I will make here. Click here on this link and here or look at the end of the page.
Terminology
With mosaic crochet (with my patterns that are derived from interwoven crochet patterns) the written instructions look a bit different than what you are used to, but it is actually quite simple! The method I developed makes the instructions shorter and more readable, which makes the working speed much higher! And this is of course very nice with big patterns without much repeats.
What it comes down to is that I left out all instructions for the dc’s, with the exception of a dc at the start of a row and a dc at the end of a row. After every series of sc’s there will always be 1 dc, with the exception of the last series.
I will explain this with the following samples, but they will also come by with the pictures.
Example 1
An example is this one: swdc || 7x || 1x || 21x || ewdc. Sounds cryptical? 🙂 🙂 🙂 Not really if you know what this means!
swdc = start with dc, ewdc = end with dc.
- 7x means you have to make 7 sc’s, followed by a dc.
- 1x means you have to make 1 sc, followed by a dc.
- 21x means you have to make 21 sc’s.
Why do I not say to make a dc after the last one? Because this is the rule:
Every row starts and ends with a sc, unless it is explicitly mentioned you have to make a dc!
You see the instructions of this row end with ewdc. So after these 21 sc’s there actually will be a dc. So it may seem a bit double now, but with the next example you will see there really is a good reason to use this notation!
For comparison the fully written instructions: dc 1x, sc 7x, dc 1x, sc 1x, dc 1x, sc 21x, dc 1x
Example 2
With the next example I show you how repeats work.
*(1x)* 3x || *(3x)* 2x || *(1x)* 5x || 3x || *(1x)* 3x
- We will start this row with *(1x)* 3x. You will repeat the parts between the asterisks 3 times. In this case this means each time 1 sc followed by a dc. So: 1 sc, 1 dc, 1 sc, 1 dc, 1 sc, 1 dc.
- *(3x)* 2x: Here you will also repeat the part between the asterisks, so 2 times 3 sc’s followed by a dc. This makes: 3 sc’s, 1 dc, 3 sc’s, 1 dc.
- *(1x)* 5x is the same as the start of the row, but this time you will make a sc with a dc 5 times.
- 3x: this is simply 3 sc’s followed by a dc.
- *(1x)* 3x: same as the start of the row, but this time NO DC after the last sc!!! Remember this rule: every row starts and ends with a sc, unless it is explicitly mentioned you have to make a dc! And in this case it isn’t mentioned to make the last dc, so we will not make it 🙂 .
For comparison the fully written instructions: *(sc 1x, dc 1x)* 3x, *(sc 3x, dc 1x)* 2x, *(sc 1x, dc 1x)* 5x, sc 3x, *(dc 1x, sc 1x)* 3x
Explanation of the pattern chart
Maybe you prefer working from a chart. In the pattern charts I make for mosaic crochet, I am helping you to prevent making mistakes in 2 ways and I provide a way so that you don’t have to count very much.
Click on the picture to see it full size.
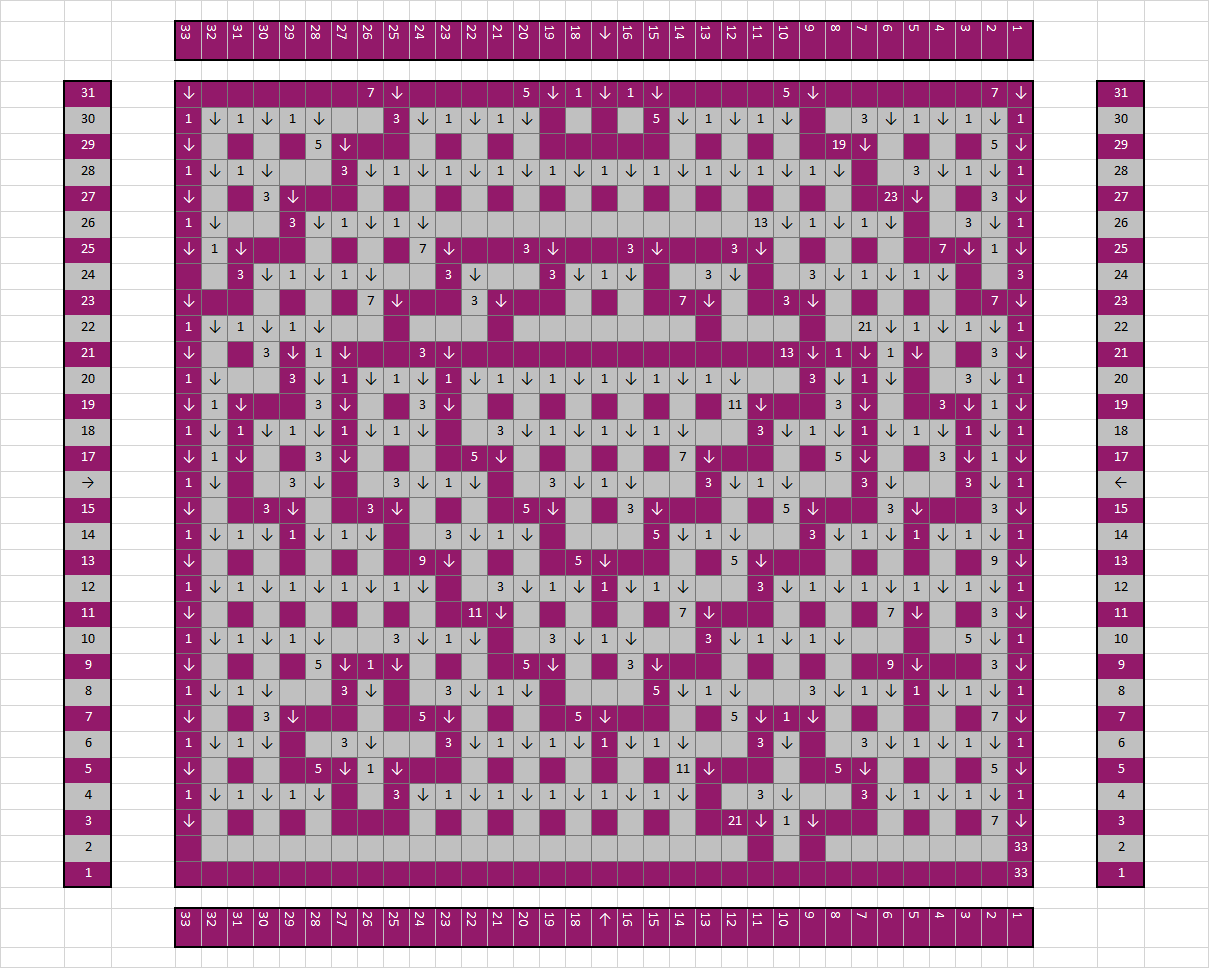
First of all you see columns at the left and right with row numbers and the colors that you will be working with. Of course you can choose your own colors.
At the bottom right at row 1 you see the number 33. This means you first have to make a setup of 33 chains. After that you will make 1 turning chain and crochet 33 sc’s into the setup. the first sc will be made into the second loop from the hook. This will all be done with color 1, in this case the dark pink. Together this counts as row 1!
In the second row you will be working with color 2. You see here also the number 33 at the right. This means you will be making 33 sc’s. At first glance it might be confusing that you also see blocks in color 1 in this row, like at the start and the end of the row, and at the first cross, but this will all get clear at the photo tutorial.
In row 3 you will be working with color 1 again. In this row you see arrows pointing down. This means that you have to make a dc in that place. After the arrow at the right (you have to read the pattern from right to left!) you see the number 7. This means you make 7 sc’s in color 1. This way you never have to count the stitches when there is a long length of sc’s in a row.
Click here to go to the next page of the tutorial.
The videos