
To reduce the loading time of this page I use ‘thumbnails’. These are reduced, and sometimes cropped versions of the bigger picture. Do you want to see something completely and full size, or download a pattern, then click on the small picture to see it all.
Index for the practice piece
- Intro and setup: that’s this page
- Row 1: click here to go to that page
- Row 2: click here to go to that page
- Row 3 and finishing: click here to go to that page
The video’s
For each part I made video’s.
The introduction video: https://youtu.be/a9YXKDGgBh8
The setup video: https://youtu.be/7gxhRvNhISs
Or see the links at the end of this page.
The pattern download
Click here to download the pattern of the practice piece
Why making a practice piece?
The practice piece is for mastering the first steps of interwoven or locking crochet. Next to that it is also a test for yourself to see if the crochet hook you will be using leads to the wished result. As I already mentioned in the introduction, you have to crochet quite loosely for this technique. When you weave the 2 layers through eachother, you don’t want it to get so tight that you end up with a ‘stiff plank’.
I also learn you how to read the pattern charts. I provide written directions also, but you can also follow the charts.
If you use a different yarn than I used, this is also a good way to see what measurements you will get.
Very important: follow the pattern! Do not make more or less stitches!
Because the pattern of the big blanket has several different motifs, it is very important that you stick to the number of stitches. When the entire CAL is finished, you can start making your own variations, because then you can see the big picture and estimate the consequences of making more or less stitches. But you will have to have a little patience for that.
The pattern and information about the practice piece
I set up a simple beginners pattern that’s 20 squares wide and 20 squares high. This is the number of squares of the outer side. The inner side is 19 by 19 squares, and it will become clear later why that is.
The measurements I got (without blocking), was approximately 21 by 21 cm (8.25 x 8.25 inch), so nicely square. Try to achieve this, to prevent that the patterns look ‘stretched out’.
This is the pattern we will be making:
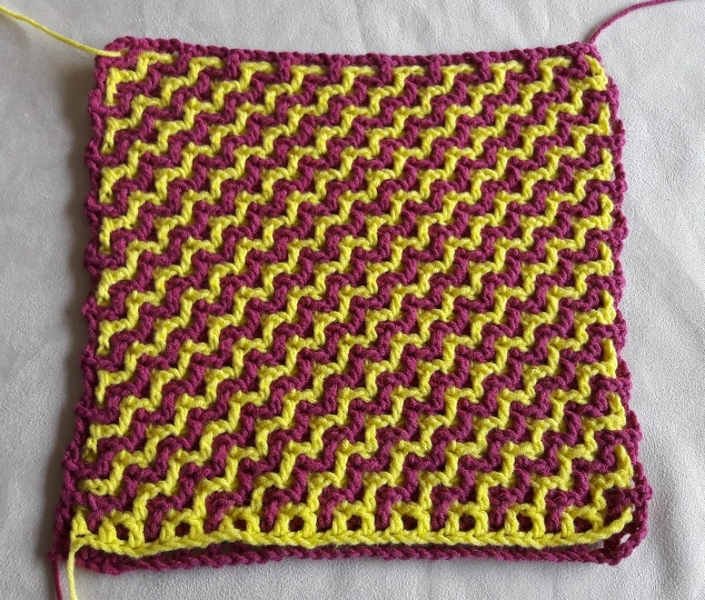
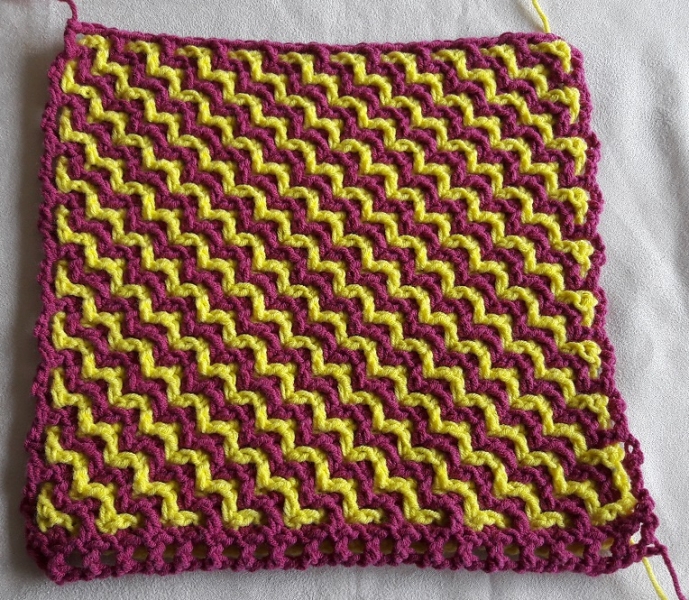
As you can see at the bottom of this piece, when you click on these pictures, the pattern doesn’t continue consequently. This is the way I once learned how to do it. I will learn you another way however, that will make the pattern continue correctly. This way will be a tiny bit more difficult, but it has my absolute preference! It just looks so much better for the pattern: just see the pictures further on this page! If you follow the directions I will give very precisely, you will definitely manage to do it.
The practice piece will not be part of the big CAL by the way, so see for yourself if you want to do all 20 rows, or that you totally get it after a couple of rows and you feel you have the right hooksize. If you do finish it and make something fun of it (like a pencil case for instance), please let me know! Than I can show it on these pages for the others!
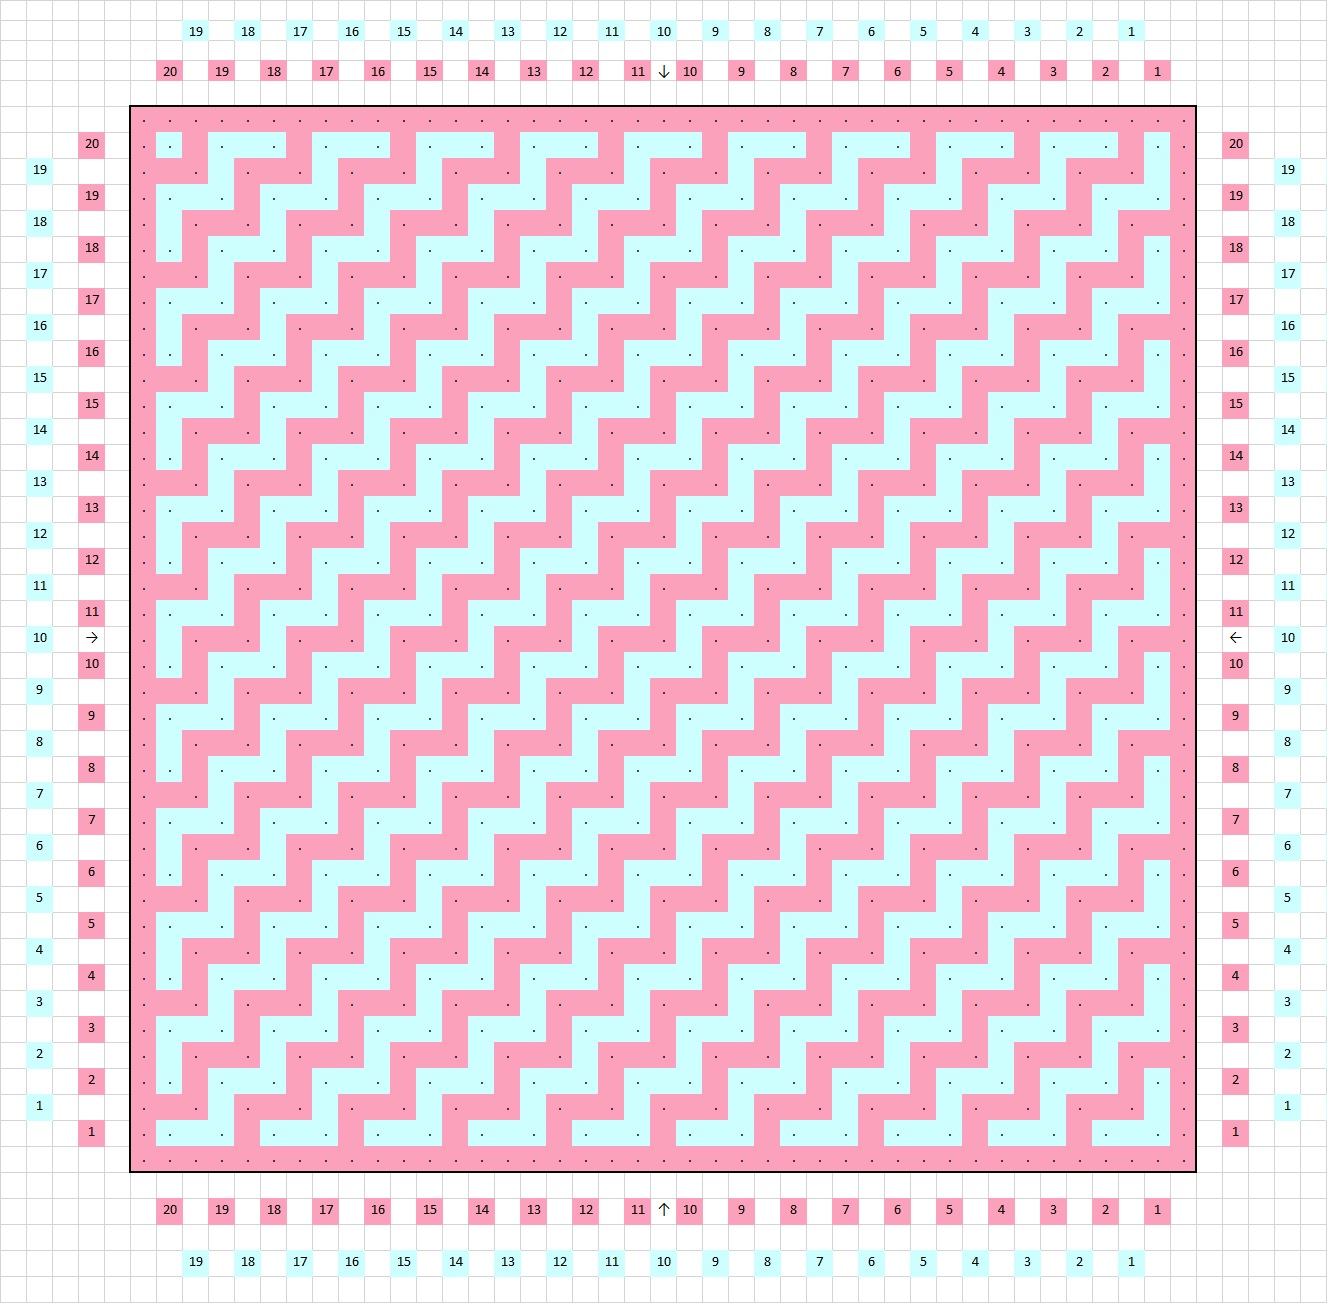
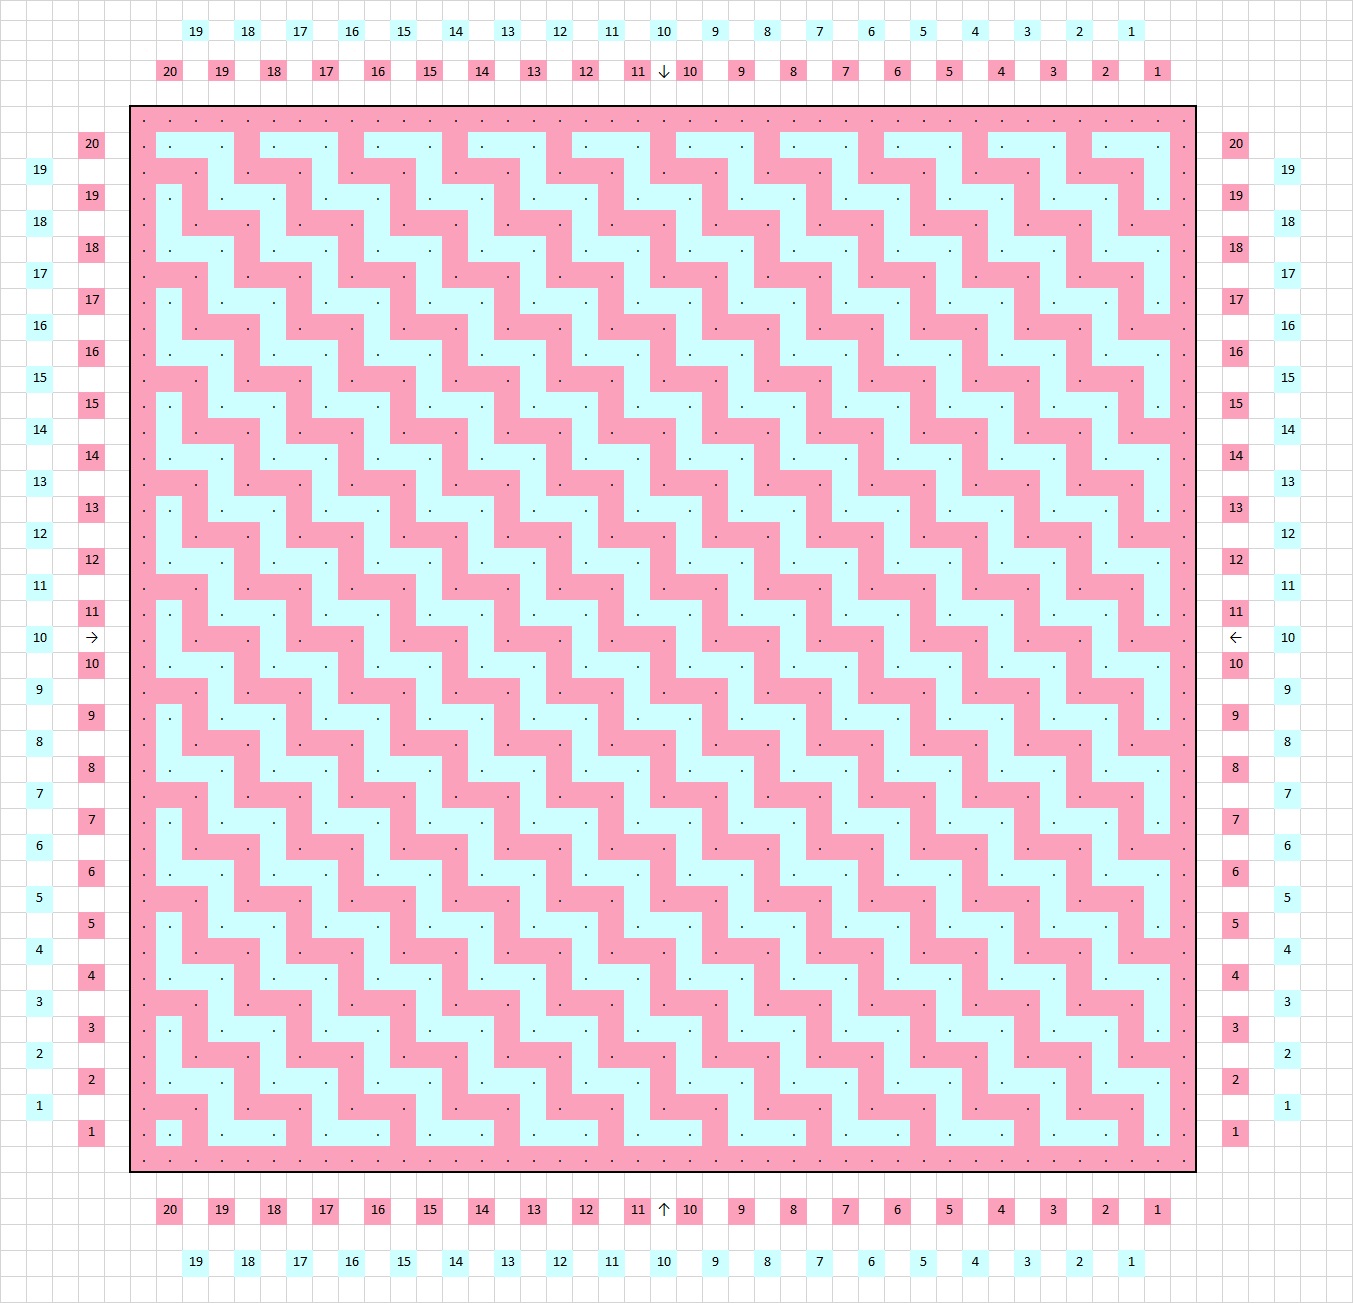
These are the pattern charts for the front and the back (click on these pictures to download them and to see them in full). The pattern looks different on each side. With this pattern it doesn’t differ very much, the ‘stairs’ just go in a different direction, but with this technique it is possible to have patterns that look totally different on the front and back. So it’s handy to have a pattern for each side, so you can see where you are.
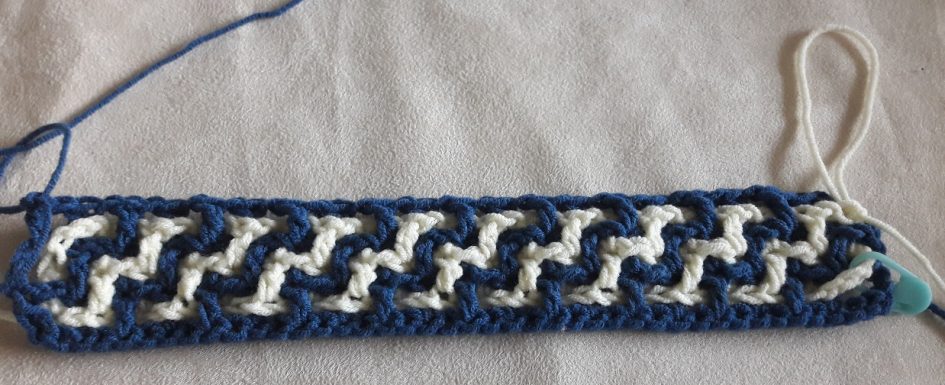
These pattern charts are made in pink and light blue. I left that this way on purpose, because I want to learn you how to ‘read’ a pattern chart if you don’t have a written pattern. What is pink here, is color 1. Wat is light blue here, is color 2. The colors I used in the video and the pictures after this are a dark blue for color 1 and offwhite for color 2.
Step by step
The explanation I will give is quite comprehensive. It may be a bit much if you are an experienced crocheter, but I really want the less experienced crocheters to be able to follow this. That’s what really pleases me the most: explaning something in a way everyone can follow. So if you do have more experience, read through it a bit quickly and pick up what’s important for you.
You will work with 2 colors: color 1 is also the color that surrounds the piece. Color 2 falls in the ‘inner part’.
The filet crocheting is a little bit different that the usual filet crochet. You will be making squares by crocheting double crochets with 1 chain stitch in between them.
Setup row (row 0), color 1
For the setup of the practice piece you will need (2 x 20) + 1 = 41 stitches of color 1. This is what I usuall call row 0. For the setup you can use the way you like the best. This can be chains, but I used the ‘long tail’-method. If you don’t know how to do that, please watch my video. It is really simple, and it has the advantage that it’s really stretchy, and that you can see very clearly where to make your stitches. Especially this last thing is really recommended for this!!!
For the ‘long tail’-setup you need a thread that’s 75 cm long.
Mark stitch 10, 20 and 30 with a stitch marker. Also mark stitch 39. This is the stitch in which you will be making your second double crochet in row 1a (the side double crochet that we will make is counted as number 1). Do yourself a favor and use this stitch markers at the places I advise you, because they are really going to help you! For this practice piece it is not a disaster if you have to start over again, but for the large project you really really really need them, so get used to it with this now.
Setup row (row 0), color 2
For the setup for color 2 you will need (2 x 19) + 1 = 39 stitches. Use chain stitches(!) for this setup to have it look very much the same as the rest of the piece. This is 2 stitches less than the setup of color 1! The ‘inner side’ with interwoven crochet is 1 square less than the ‘outside’, so we have 2 stitches less.
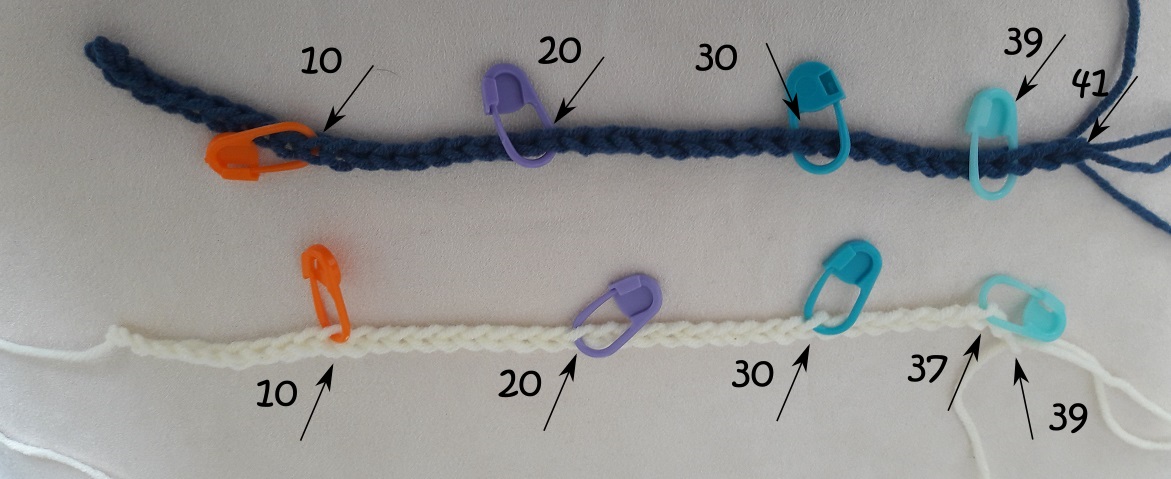
Mark stitch 10, 20 and 30 with a stitch marker. Also mark stitch 37. This is the stitch where you will be doing your second double crochet in row 1b. Especially with a chain row the markers are essential to check if you’re still doing correct with counting.
Row 1 of the practice piece
Click here to go to the page with the tutorial for row 1