
FYI: I’m using US terminology for naming the crochet stitches
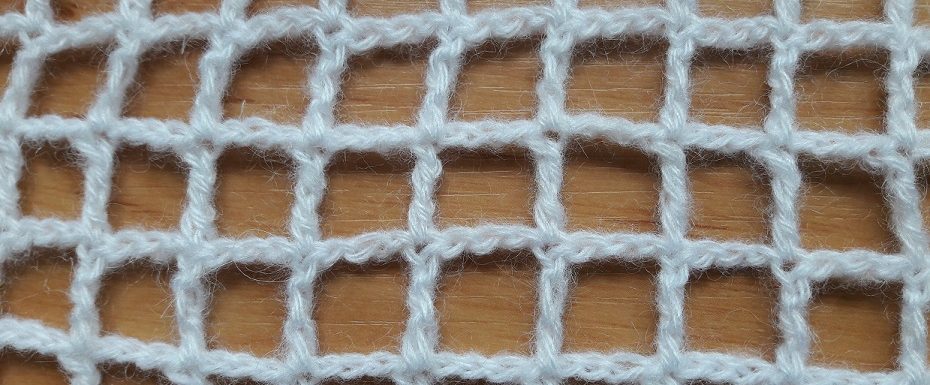
Regular filet crochet is usually done with openings that are made with 2 chain stitches and a double crochet. This is a tutorial about filet crochet with a large mesh, by using 3 chain stitches and a triple(!) crochet. It isn’t very much different than regular filet crochet of course, but I will also show you how to decrease. Especially the slanted decreases get attention, because I could not find them at all on the internet. It will probably be somewhere, but no way I could discover it. So I tried a couple of things out myself and made a record of it for you here. I also made the accompanying video’s, you will find to links to them at the bottom of the page.
The crochet hook
Usually you use a larger size hook for casting on your crocheted piece than the hook you will use for the rest of your work. Actually this isn’t really necessary for this, especially when using chain stitches for the cast on. Nowadays you see other ways of casting on, hence… You usually need a larger size hook, because the stitches that you make in the chain stitches are usually thicker than a chain stitch. And that will make things tight if you got a bunch of them next to eachother. This is filet crochet with an open mesh, so the stitches in the next row do not have that issue.
But, as always: test it out yourself on a small piece! It might be that your way of working needs it, or maybe you will use another way of casting on that really needs to have a larger hook size. So always check!
The used symbols in the pattern charts


The base
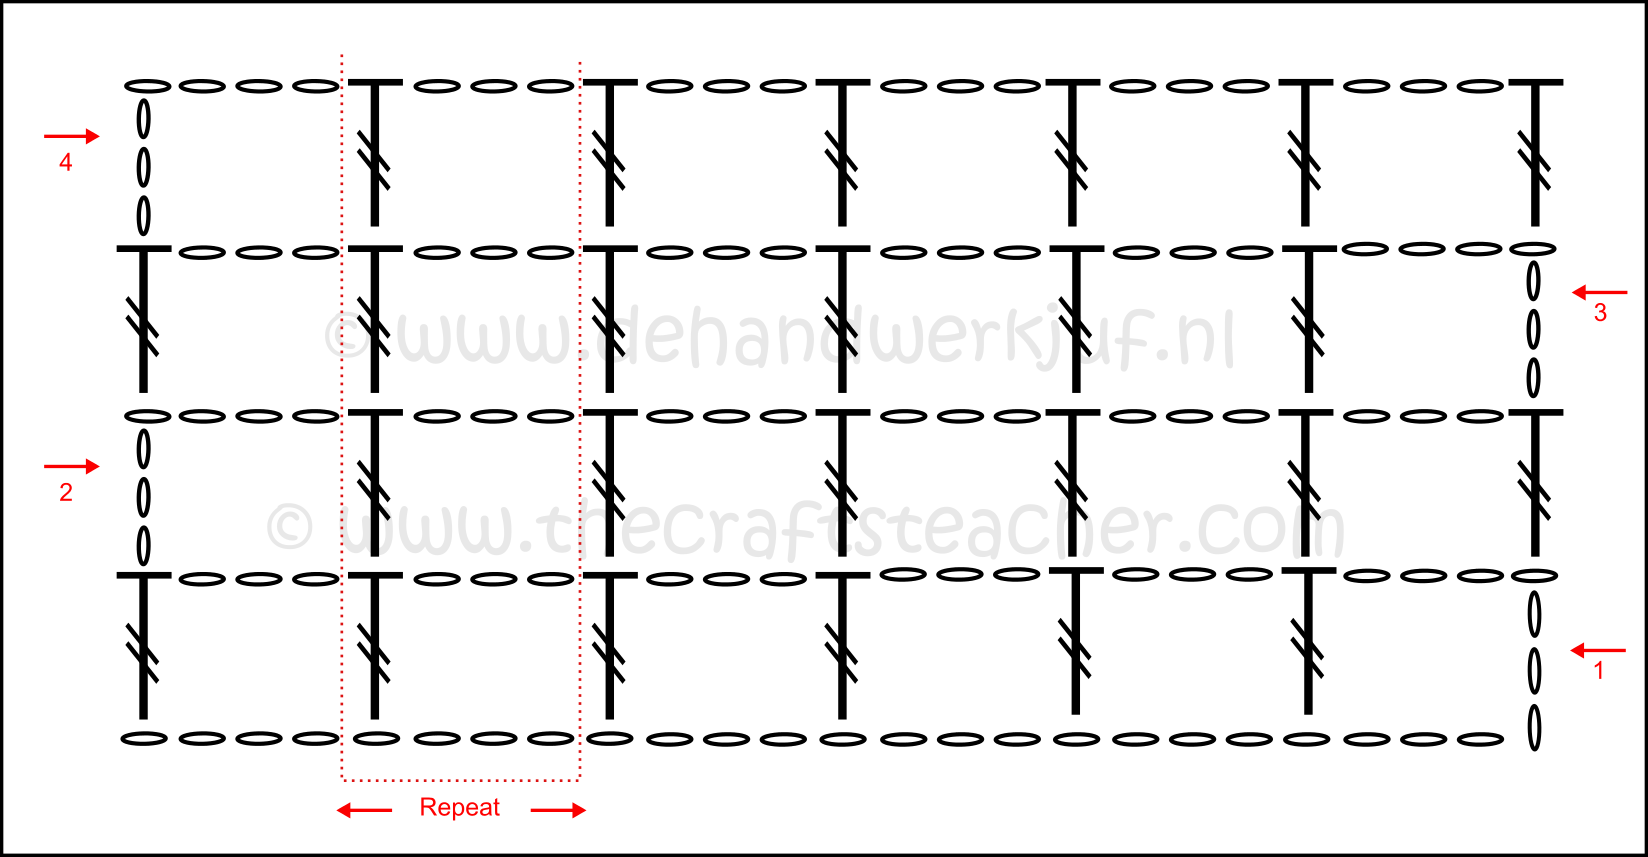
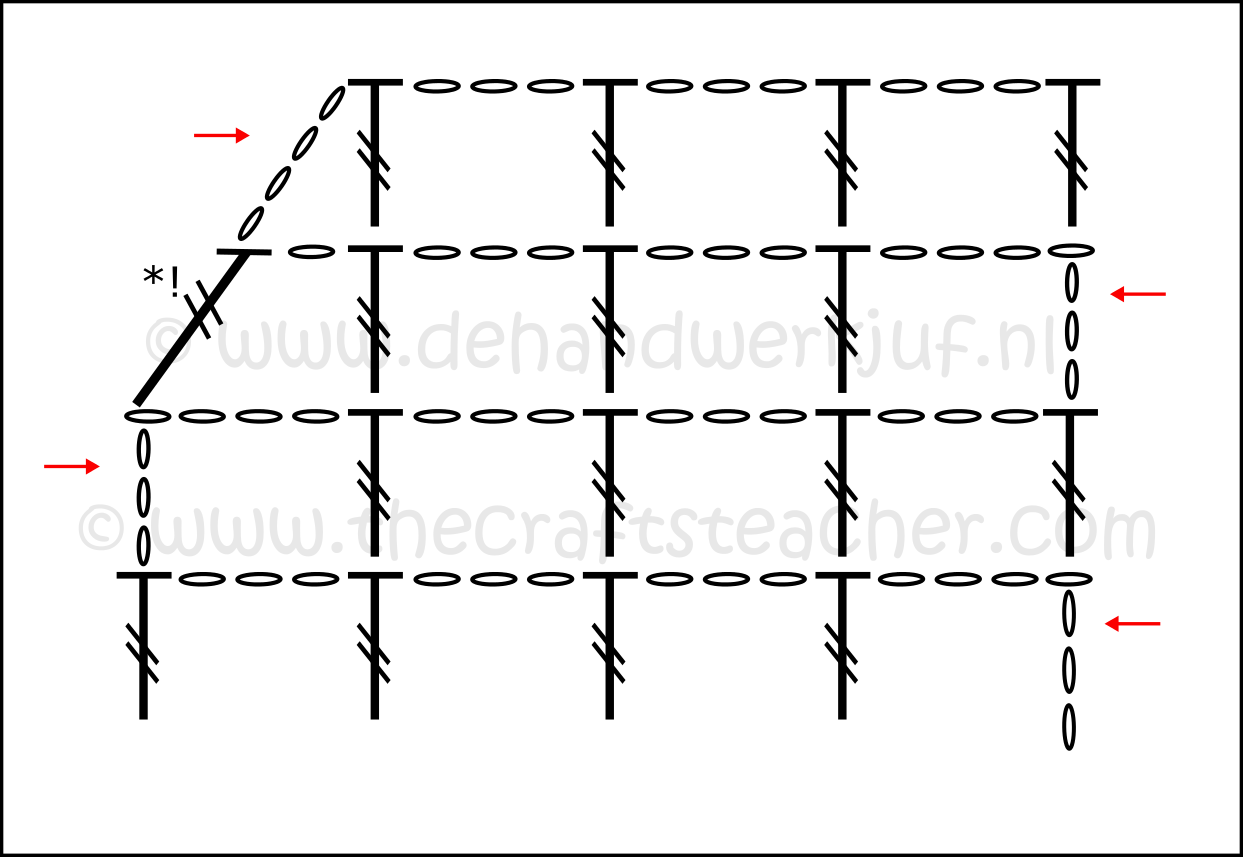
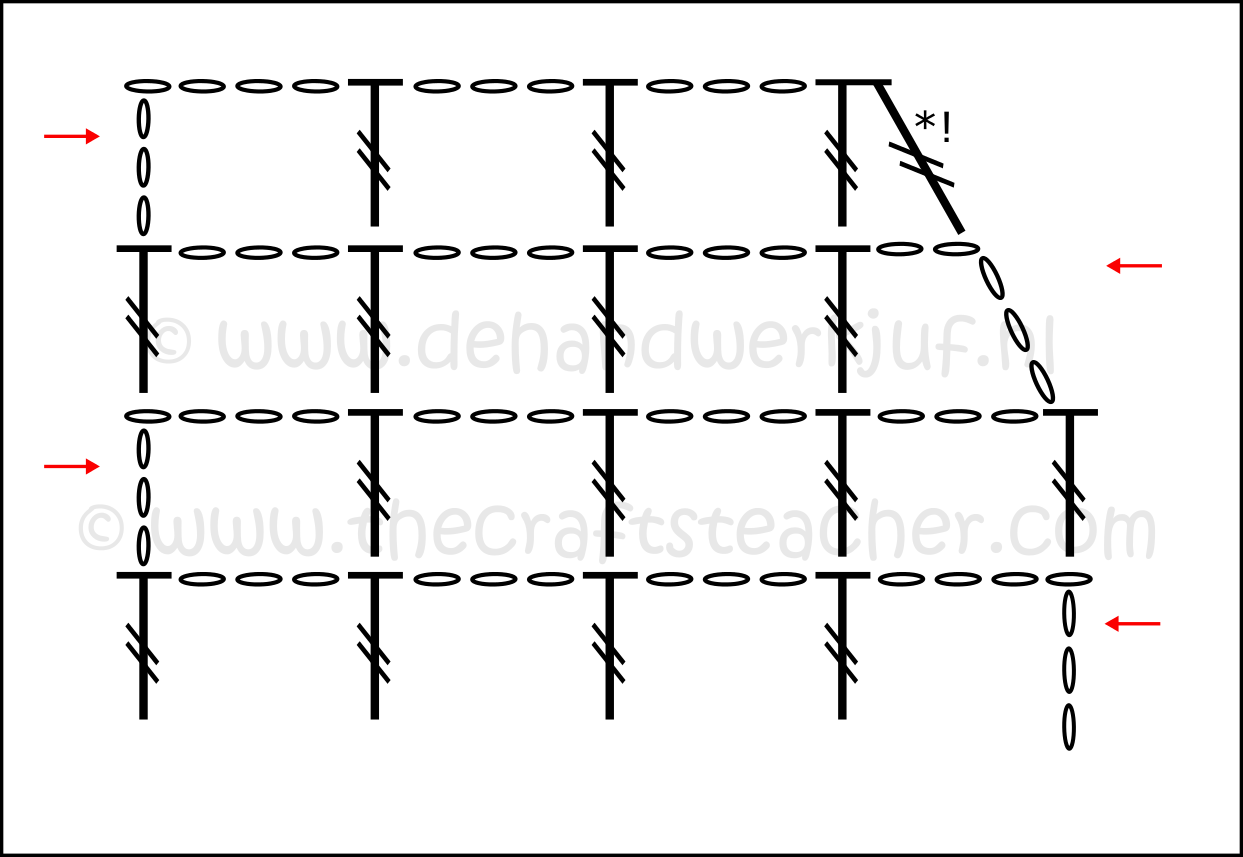
Click on the chart to see it big and for downloading!
The setup
The pattern is a repeat of 4 stitches: 3 chains and a triple crochet. For the setup you will make a chain of chain stitches, or use another way of casting on. For calculating how many stitches you need, you will use this formula: # of squares * 4. In the example you see 6 squares, so you will need 6 * 4 = 24 stitches. No, I’m not forgetting something, wait a second, I use a different approach that I find easier than what you see in most patterns 🙂 . But do pay attention though: if you use a different way of setup, and you will have to make your first triple crochet in the last stitch of your setup row, then you must add 1 stitch extra!
A little trick: in a moment in row 1 you must find the spot where to make your first triple crochet. You can just count, like most of us do. But if you find that a bit cumbersome, or you don’t feel sure about it, or you just find this handy 🙂 , then mark the stitch with a stitch marker where it has to go before you continue! I show you how to do that in the video. It is 3 stitches before the end of your setup row. In this case it is in stitch 21.
The first row
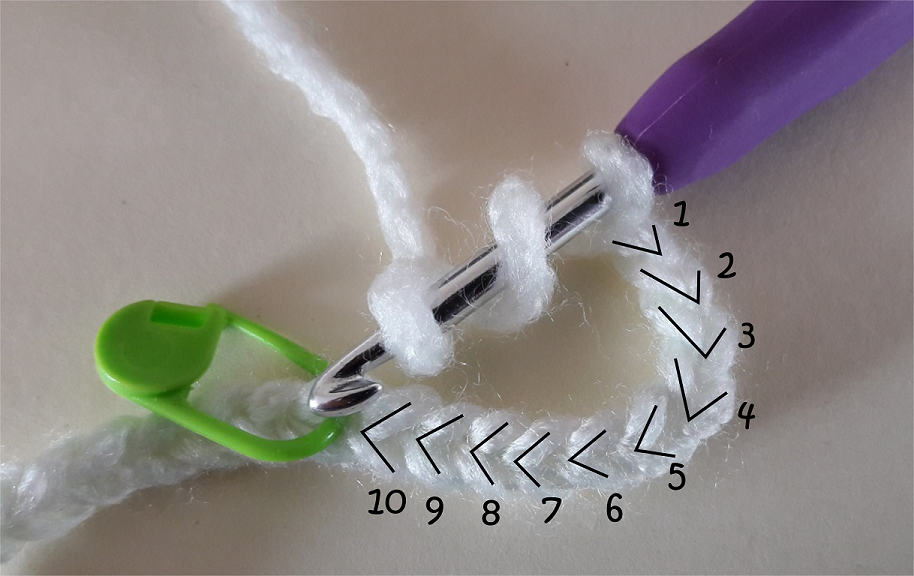
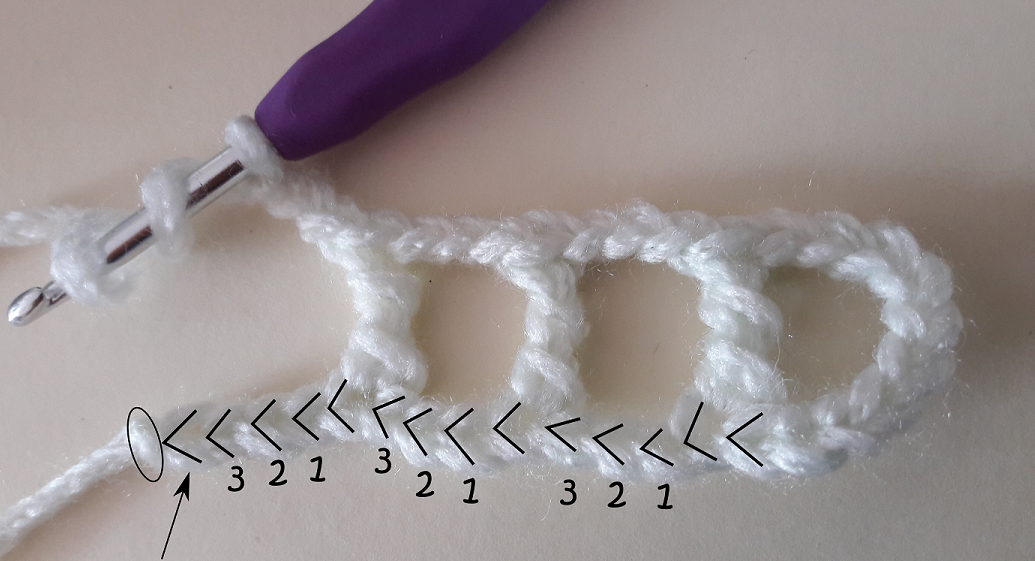
In the pattern chart you see I used 4 turning chains for the first triple crochet of a row. It might be that you prefer to use another way of making that first triple of a row. Replace these 4 turning chains in that case by your way. Then make 3 chains to create the top of the square. So it is a total of 7 chains if you do use the 4 turning chains. You now make a triple crochet in the stitch you marked with a stitch marker, or the 11th stitch counted from your hook if you prefer to count. After that you will do a repeat of 3 chain stitches, skip 3 stitches of the setup row and make a triple crochet in the 4th stitch. If you have done this correctly, you will end up exactly at the last stitch of your setup row when making the last triple.
The next rows
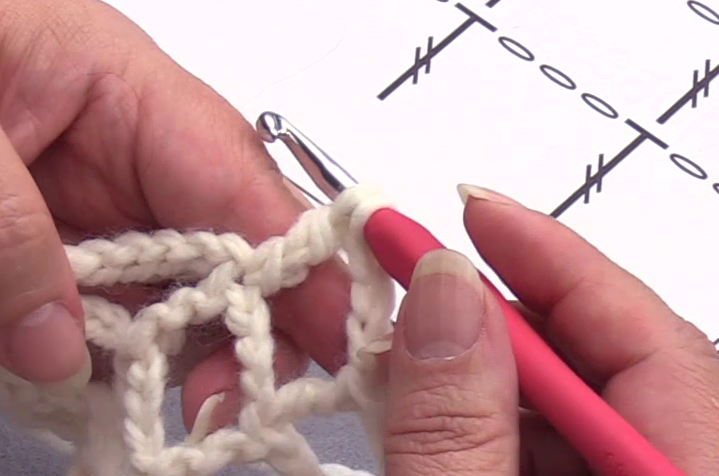
Turn your work (be consistent in which way you turn, always to the left or always to the right), crochet 7 chains (or your own way of making a triple followed by 3 chains), and make a triple in the next triple of the previous row. Repeat making 3 chains and making a triple in the next triple of the previous row till the end of the row.
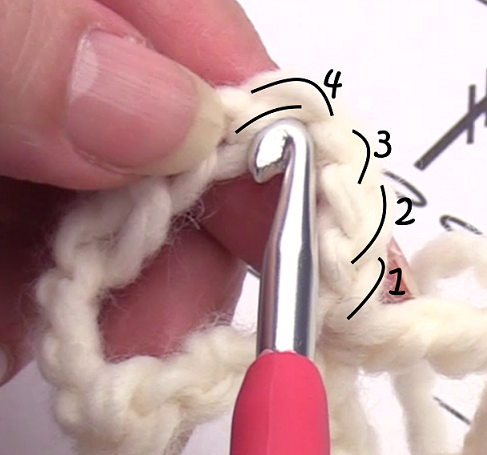
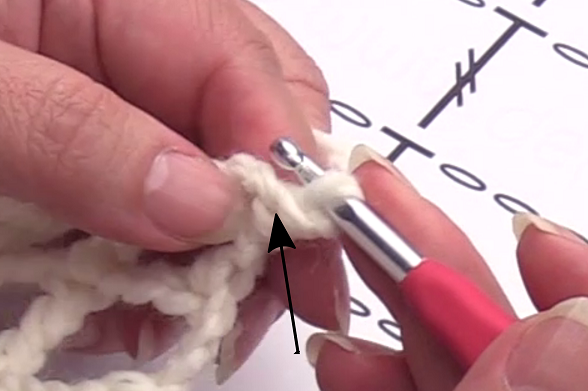
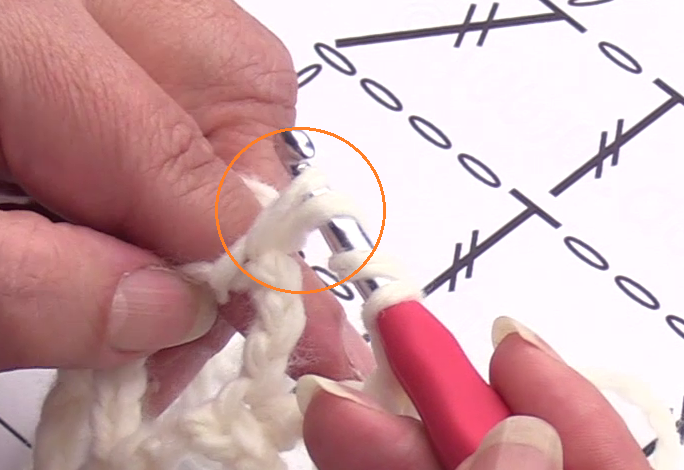
Look closely to where to insert your hook with the last triple. If you’ve used turning chains, skip 3 stitches, and insert your hook into the 4th chain. Do not only pick up the upper loop of the chain, but also the ‘bump’ (which is actually the loop that connects 2 chains at the back) that is right under it. This makes the connection more firm and reduces the risk of stretching out too much when blocking your piece.
Decrease straight up
If you decrease straight up, you will get a kind of ‘stairway’ border alongside of your work. With many patterns you see that, later, with the finishing, by crocheting a border around it, they will turned into slanted borders, but of course this depends on what your making. I will show how to make a slanted border right away further on this page.
At the end of a row

This is the most simple way to decrease squares! Suppose you want to decrease 2 squares at the end of your row, You just make your last triple that’s just before the last 2 squares, you turn your work, and continue with the next row. This could be a square, like in the picture, but it could also be a slanted decrease like I show further on this page.
At the start of a row

When you’ve ended a row, and you have to, for example, skip 2 squares at the start of your next row, you have 2 options. The first option is to cut off your yarn, turn your work and than reattach your thread at the spot where you have to start again. If you don’t want to cut your thread, you have to work to the spot where you have to continue with your pattern, preferably as invisible as possible. You will do this by using slip stitches.
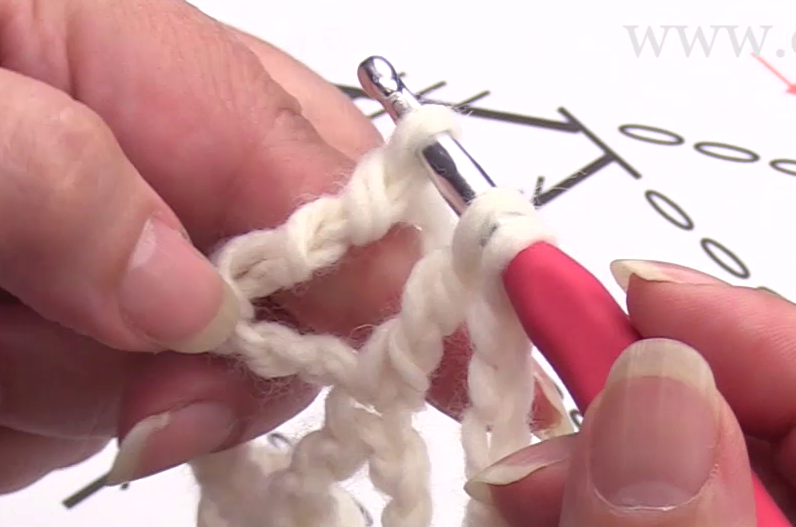
Turn your work at the end of your (previous) row, and make a slip stitch right away in the first stitch, so above the last triple of the previous row.
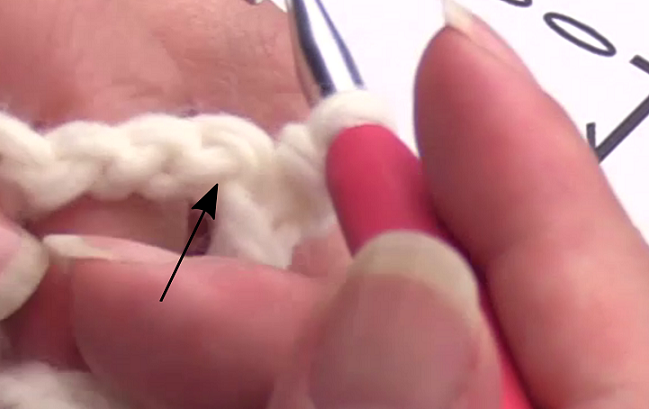
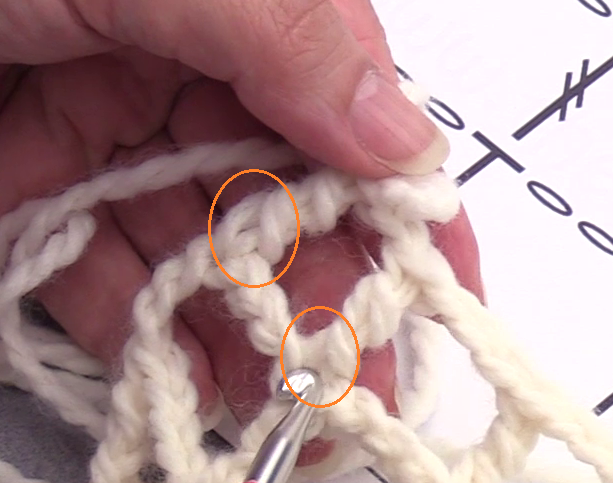
Next make slip stitches in the next 3 chains. I do not only pick up the upper loop of the chain stitch, but I also take up the bump below it. I show this also clearly in the video. If you want to, you could of course only take up the upper loop if that has your preference or think that looks more nicely.
Make another slip stitch into the next triple. Always end with this. You can now continue with the rest of your pattern if you want. So you could continue now with making 7 chains. In this case you made a decrease of 1 square. If you need to decrease more squares, then make again slip stitches in the next 3 chains and the next triple. Repeat this until you’ve reached the place where you have to be.
Slanted decrease of 1 square over 1 row
If you want to have a slanted border, and you don’t want to do that only afterwards with crocheting a border around your piece, that can be done. You often see only decreases that go right up, and that later with finishing a piece the straight ‘gaps’ are bridged by chains.
At the start of a row
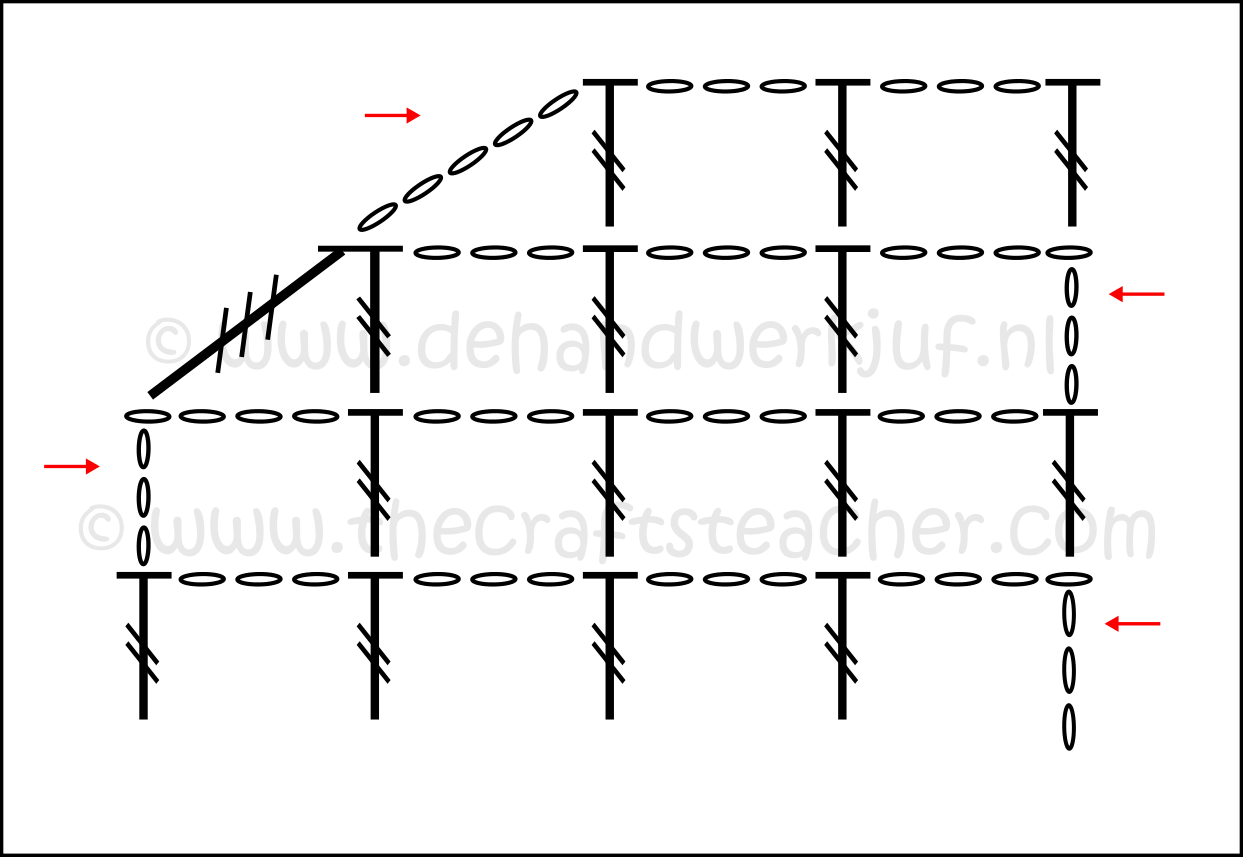
If you want to make a slanted decrease at the start of a row, you will only have to make 5 chain stitches after turning your work, and then make your first triple into the next triple of the previous row.
At the end of a row
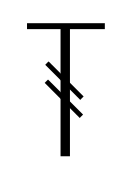
At the end of a row you do have to pay a little attention. You will now crochet 2 stitches together! You start with making a triple, but you will not finish it: stop till you have 2 loops on your hook.
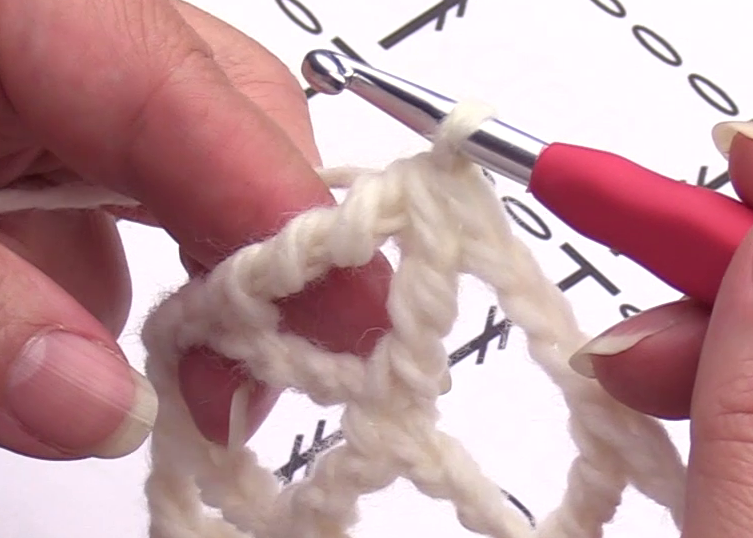
After this you will start making a double triple. You will make this double triple at the place where you would normally have done your last triple, so you skip 3 chains of the previous row and insert into the 4th stitch. Now start making the double triple, but don’t finish it till the end. When you have 3 loops on your hook, you make another wrap around your hook and pull this through all 3 loops.
Slanted decrease of 1 square over 2 rows
I had the need, at the armholes and the neckline of a vest I was making, to go up a bit steeper than with a slanted decrease of 1 square over 1 row. Actually I wanted to decrease 1 square, but distributed equally over 2 rows. And you can do this also. But you have to do this seperated over 2 rows.
At the end of a row and back
If you start this decrease at the end of a row, then the 2nd step of the decrease has to be made in the next row after you’ve turned your work.
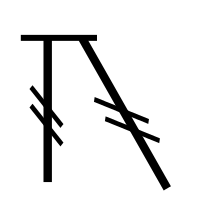
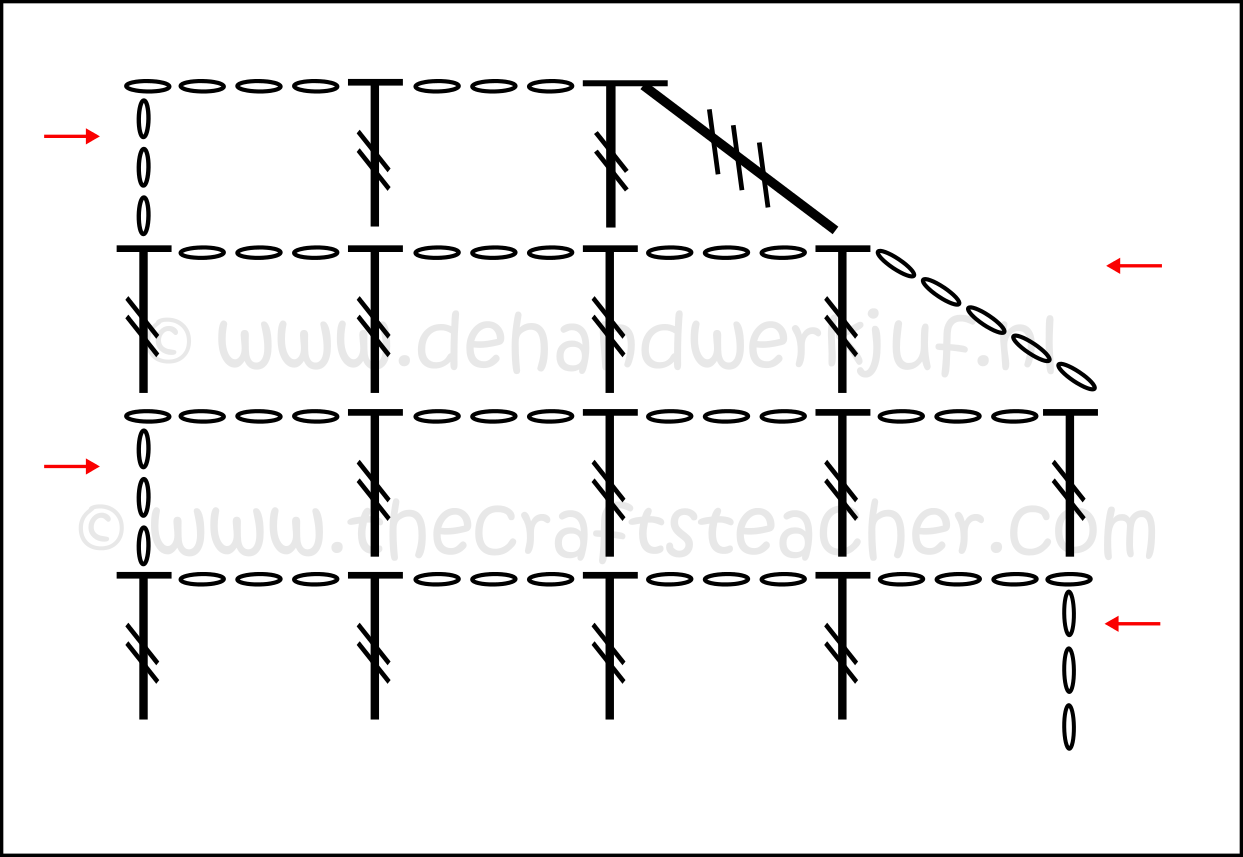
At the end of the row you will make a triple in the second to last triple of the previous row as usual. Then make 1 chain. Next you make another triple at the place where you normally would have done your last triple. But you have to extend this triple a bit. It is slanted, so it has to be a bit longer. I marked this in the chart with *!. You extend the triple by making the base longer. When you’ve inserted your hook into the 4th chain of the previous row, you wrap the yarn around your hook, you pull it through and you just carefully pull it up a little bit more than you usually do. This doesn’t have to be very much!
Just finish your stitch as usual. Take a look at your stitch to see if you didn’t make that base loop too long. You can judge that now, with the stitch being finished, the best. And do it over if you don’t like it 🙂 .
Turn your work. You will now make the 2nd part of the decrease at the start of this row by making 4 chain stitches. The first triple will be made in the next triple of the previous row. Your decrease is now done.
At the start of a row and back
If you start this decrease at the start of a row, you have to do the 2nd part of the decrease at the end of your next row.
You start with making 5 chains. This looks the same as decreasing 1 square over 1 row, but it will be shaped in the next row when you come back. Your first triple will be made in the next triple of the previous row.
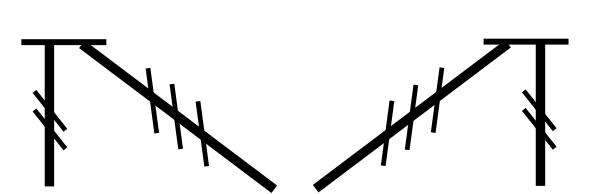
Finish your row, turn your work, and continue until you’ve come to the last triple of your previous row. Here you will, like with the decrease of 1 square over 1 row, crochet 2 stitches together. You start with a triple in the last triple of the previous row, but you do not finish it, you stop when you have 2 loops on your hook. Next you will make another triple. This will also be an extended triple, that you will extend at the base like I showed before. You will again not finish this, you will make it until you have 3 loops on your hook, and then finish the stitch by making another wrap and pull this through all 3 loops.
The place where to insert this second triple depends a bit on your hand of working! As the chart shows, you insert into the 2nd chain of the 5 turning chains of the previous row. So you skip 1 chain and insert your hook into the 2nd. This way the opening below it will be shaped and it will look differently than a slanted decrease of 1 square over 1 row. But you could also skip 2 chains and insert your hook into the 3rd chain. This makes that the top part of the ‘half’ square gets more opened up. But it does also depend on how loose or tight you make your chains. By extending the base of your second triple, you can play with the length of it. If you decide to insert into the 3rd chain, you will also have to extend the base of your stitch a bit more than when insert into the 2nd chain. Try and see for yourself what looks best for you. Also remind that, if you will make an extra border around your piece when finishing, it usually makes the border look a bit nicer. Most of the times it will look more neatly. So see what has your preference.
The links to the video’s
I hope this was again a clear tutorial! If you want to see this all on video, the links to them follow here! Have fun with applying what you’ve learned!
The video about the base:
The video about decreasing straight up:
Video about a slanted decrease of 1 hole over 1 row:
Video about a slanted decrease of 1 hole over 2 rows: