
The pattern
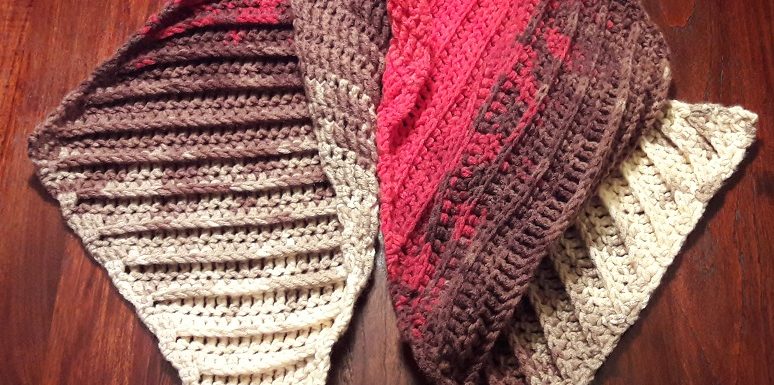
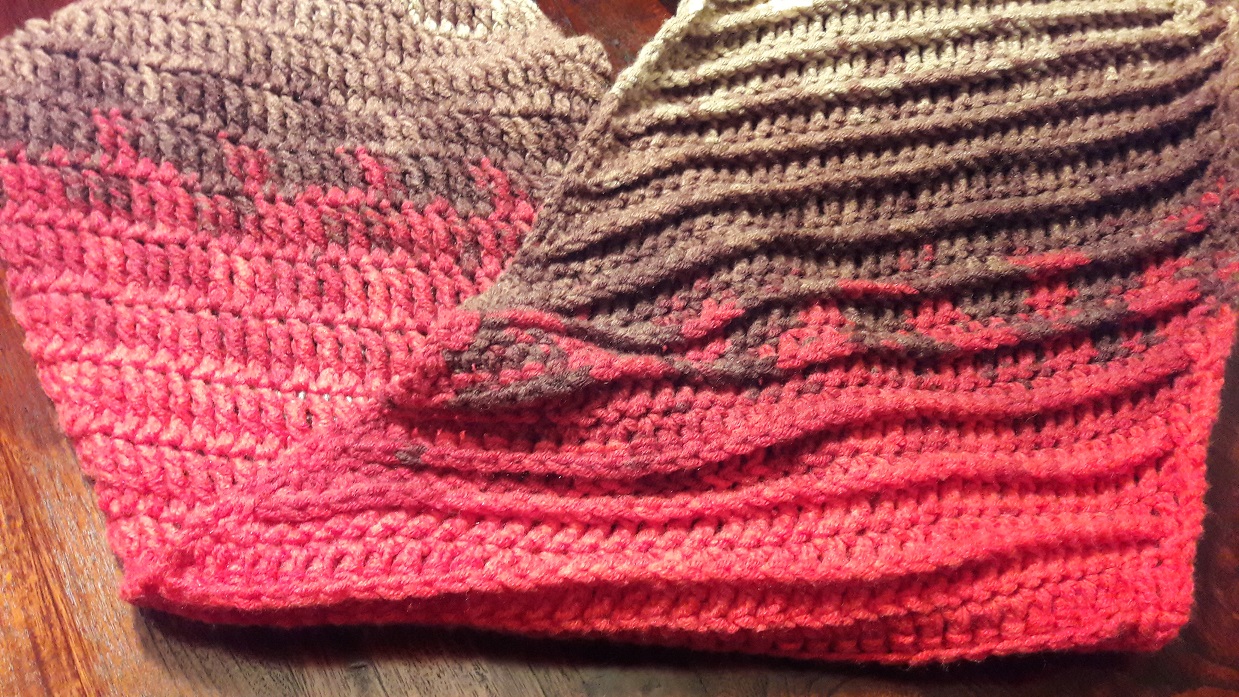
This wrap or shawl is made with reliëf stitches, that give it a beautiful structure, but because of using triple crochets, the shawl still has a certain airiness. The shawl can be worn with both sides showing, two different looks, but both just as beautiful. To be honest: I don’t know myself which side I prefer.

2 Balls of this yarn are used (500 grams, 17.64 oz), which gives the shawl a bit of a ‘heavy’ feeling, but it is still feeling supple because of the airy structure. Also, this shawl is crocheted askew, which gives the shawl a further suppleness. A nice comfortable and warm wrap for cold winterdays!
I also made 3 video’s about how to crochet this shawl. You will find the links to the video’s at the end of this page. The first part is about doing the setup and making the increases on both sides of the shawl, the second part is about making the ‘straight’ part, and the third part is about making the decreases on both sides and how to do the last row.
What do you need
- Used yarn: Alize Superlana Maxi Long Batik (Big ball)
- Amount: 500 grams, 17.64 oz.
- Crochet hook: 8 mm, US L/11
- 2 Stitchmarkers
Size
- measured along one side: 140 cm / 56 inch
- width: 40 cm / 16 inch
Info yarn
- 1 big ball is 250 grams/8.82 oz and 250 meters/273 yds
- composition: 75%acrylics and 25% wool
Used stitches
I used the US terminology for the crochet stitches. See here how to translate:
- ch = chain
- sc = single crochet (UK double crochet)
- dc = double crochet (UK treble)
- FPtr = front post triple crochet or front post treble crochet (UK front post double treble)
- dc2tog = double crochet 2 stitches together
- dc3tog = double crochet 2 stitches together
- start dc = starting double crochet
Important info about the stitches and some tips
- Use stitchmarkers! That really is a lifeline for this pattern! Especially when making decreases you can easily go wrong. So mark each first stitch of a new row with a stitchmarker! You won’t need them at other places, when using this bulky yarn you can easily count your stitches and the rows will not be very long, but of course you can use them if you like. But the most important thing is to mark that first stitch!
- The starting double crochet: When starting a new row, if you have to make a double crochet, you use a special compound version, that is made of 2 single crochets on top of eachother. I called it a starting double crochet (start dc) in this pattern. So in this pattern I do not(!) use the usual 3 chain stitches for making the first double crochet. For a photo tutorial on how to do this starting double crochet you can look here.
- Decreases at the start of a row: When you have to do a double crochet 2 together (dc2tog) at the start of a row, you will do that by combining a variation of the starting double crochet with a regular double crochet. Your regular double crochet counts as the first stitch of the new row. This is very important!!!!! Mark this stitch with a stitchmarker!
- Count your stitches after every row. In this pattern you will always have an odd number of stitches. The moment you count an even number of stitches, you will know you’ve gone wrong somewhere, probably while making increases or decreases.
- Also watch how to do the ‘double crochet 3 together’. You will again have a variation of the starting double crochet, but this time combined with the way to double crochet 2 together!
The pattern
Part 1
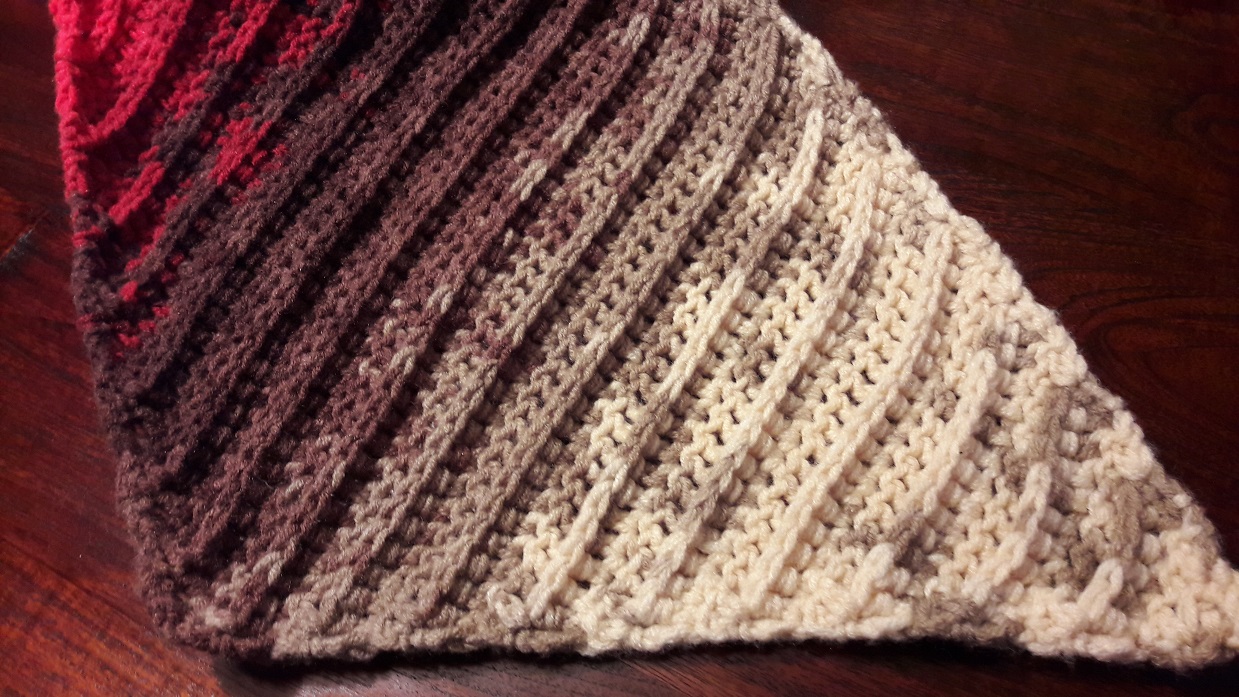
In the first part of the pattern increases are made on both sides, which will create the point on one side of the shawl.
Row 1: The first row can be set up in 2 ways. I used the version with the starting double crochet, but if you have difficulties using that for the setup row, you can use the simpler version with the 3 chains for making the first double crochet.

Make 1 chain. Make a starting double crochet (start dc) in this chain. Make another 2 double crochets (2 dc) in this chain stitch. Mark the first stitch of this row.
➡ You now have 3 stitches.
Row 1 simpler version:

Make 4 chains (4 ch). The last 3 chain stitches count as the first double crochet. Make another 2 double crochets in the 4th chain counted from your hook (this is the first chain you made). Mark the first stitch of this row.
➡ You now have 3 stitches.
Pay attention: with the pattern drawings of the rest of the pattern I assumed you used the first version of the cast on. It doesn’t matter which version you chose. From now on use the starting double crochet in the rest of the pattern!
Row 2:

Now make a starting double crochet (start dc) immediately in the last stitch of row 1. Mark this stitch, it’s stitch 1 of row 2. Make another double crochet in the same stitch. You now made a increase at the start of the row. Next make a front post triple crochet (FPtr) around the ‘post’ of the 2nd double crochet of row 1. Next make 2 double crochets in the first stitch of row 1. You now also made an increase at the end of the row.
➡ You now have 5 stitches
Row 3:
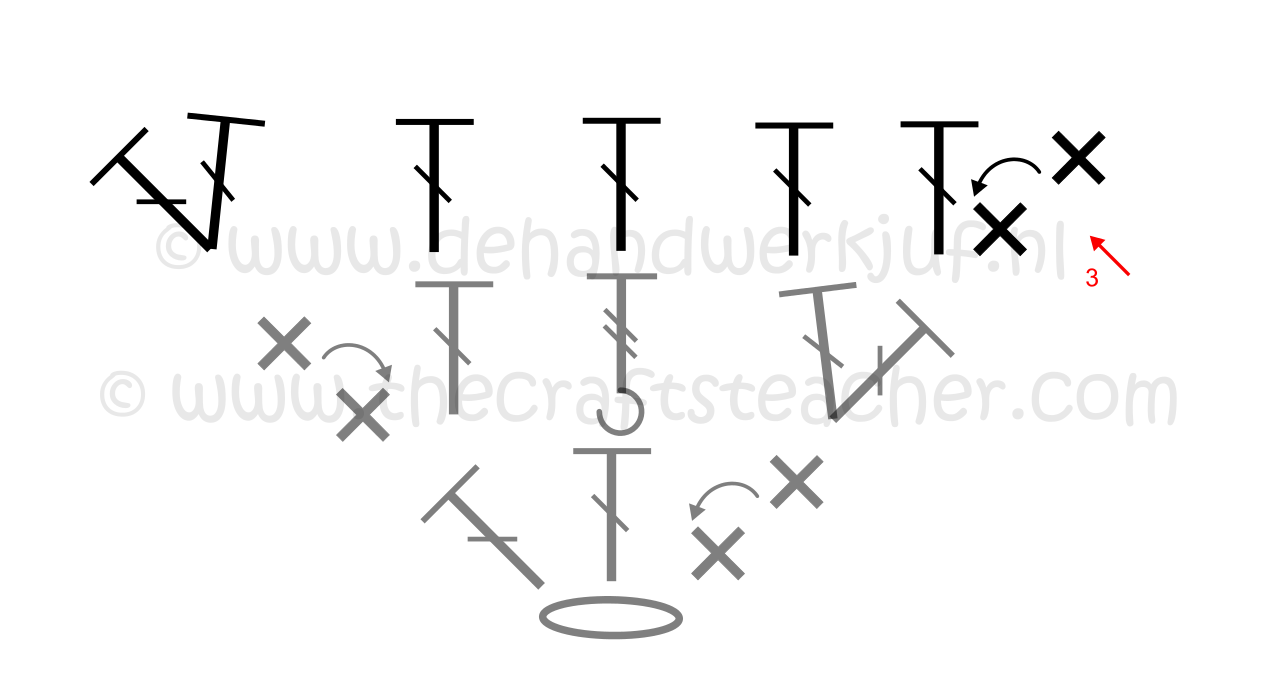
Now make a starting double crochet (start dc) immediately in the last stitch of row 2. Mark this stitch, it’s stitch 1 of row 3. Make another double crochet in the same stitch. You now made a increase at the start of the row. Make 3 double crochets in the next 3 stitches. Next make 2 double crochets in the first stitch of row 2. You now also made an increase at the end of the row.
➡ You now have 7 stitches
Row 4:
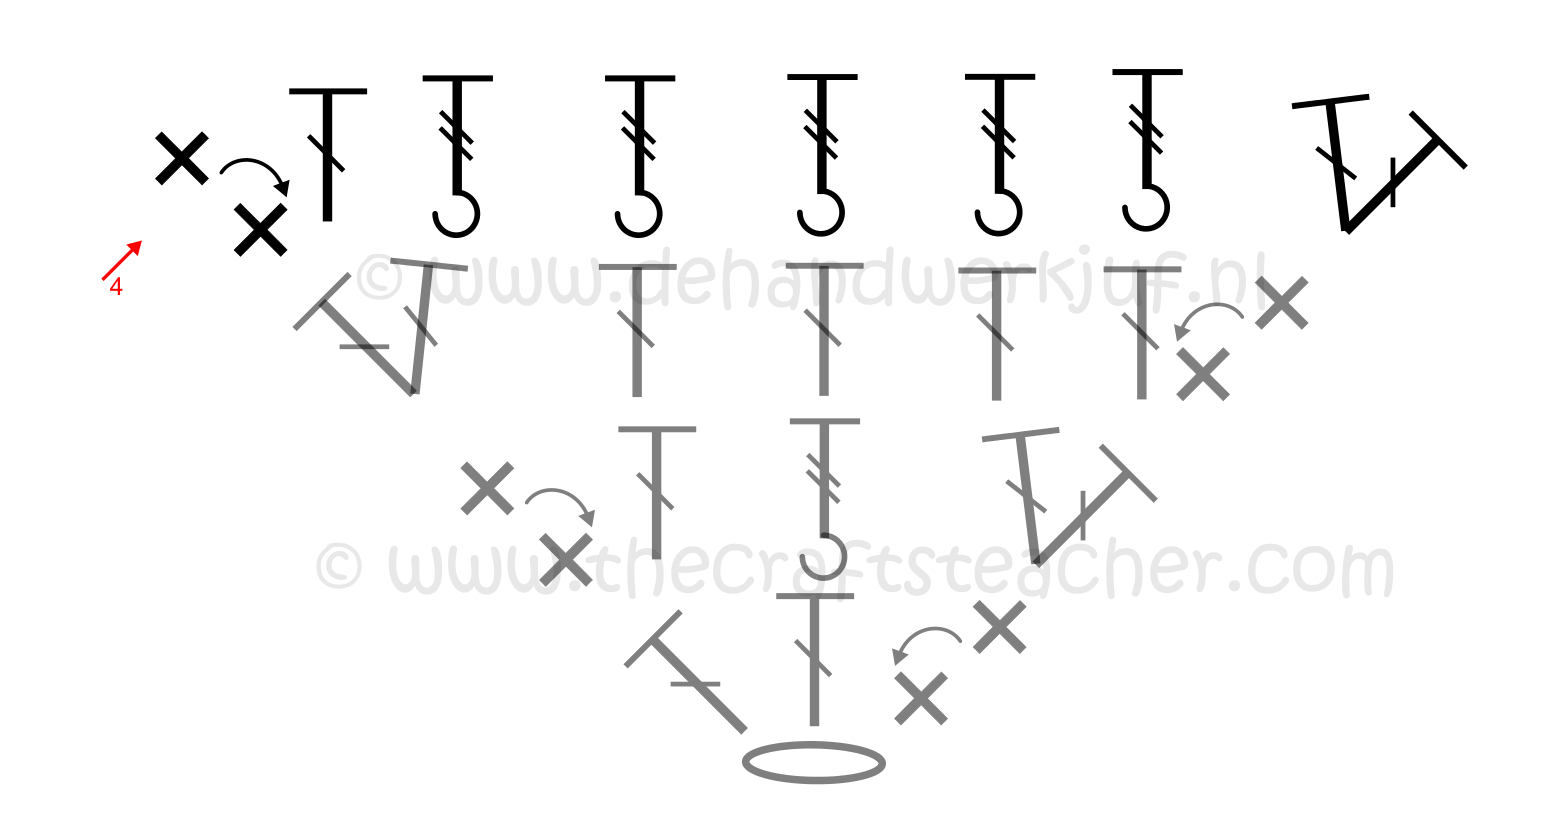
- 1 start dc + 1 dc in the last stitch of the previous row
- 5 FPtr around the next 5 dc of the previous row
- 2 dc in the first stitch of the previous row
➡ You now have 9 stitches
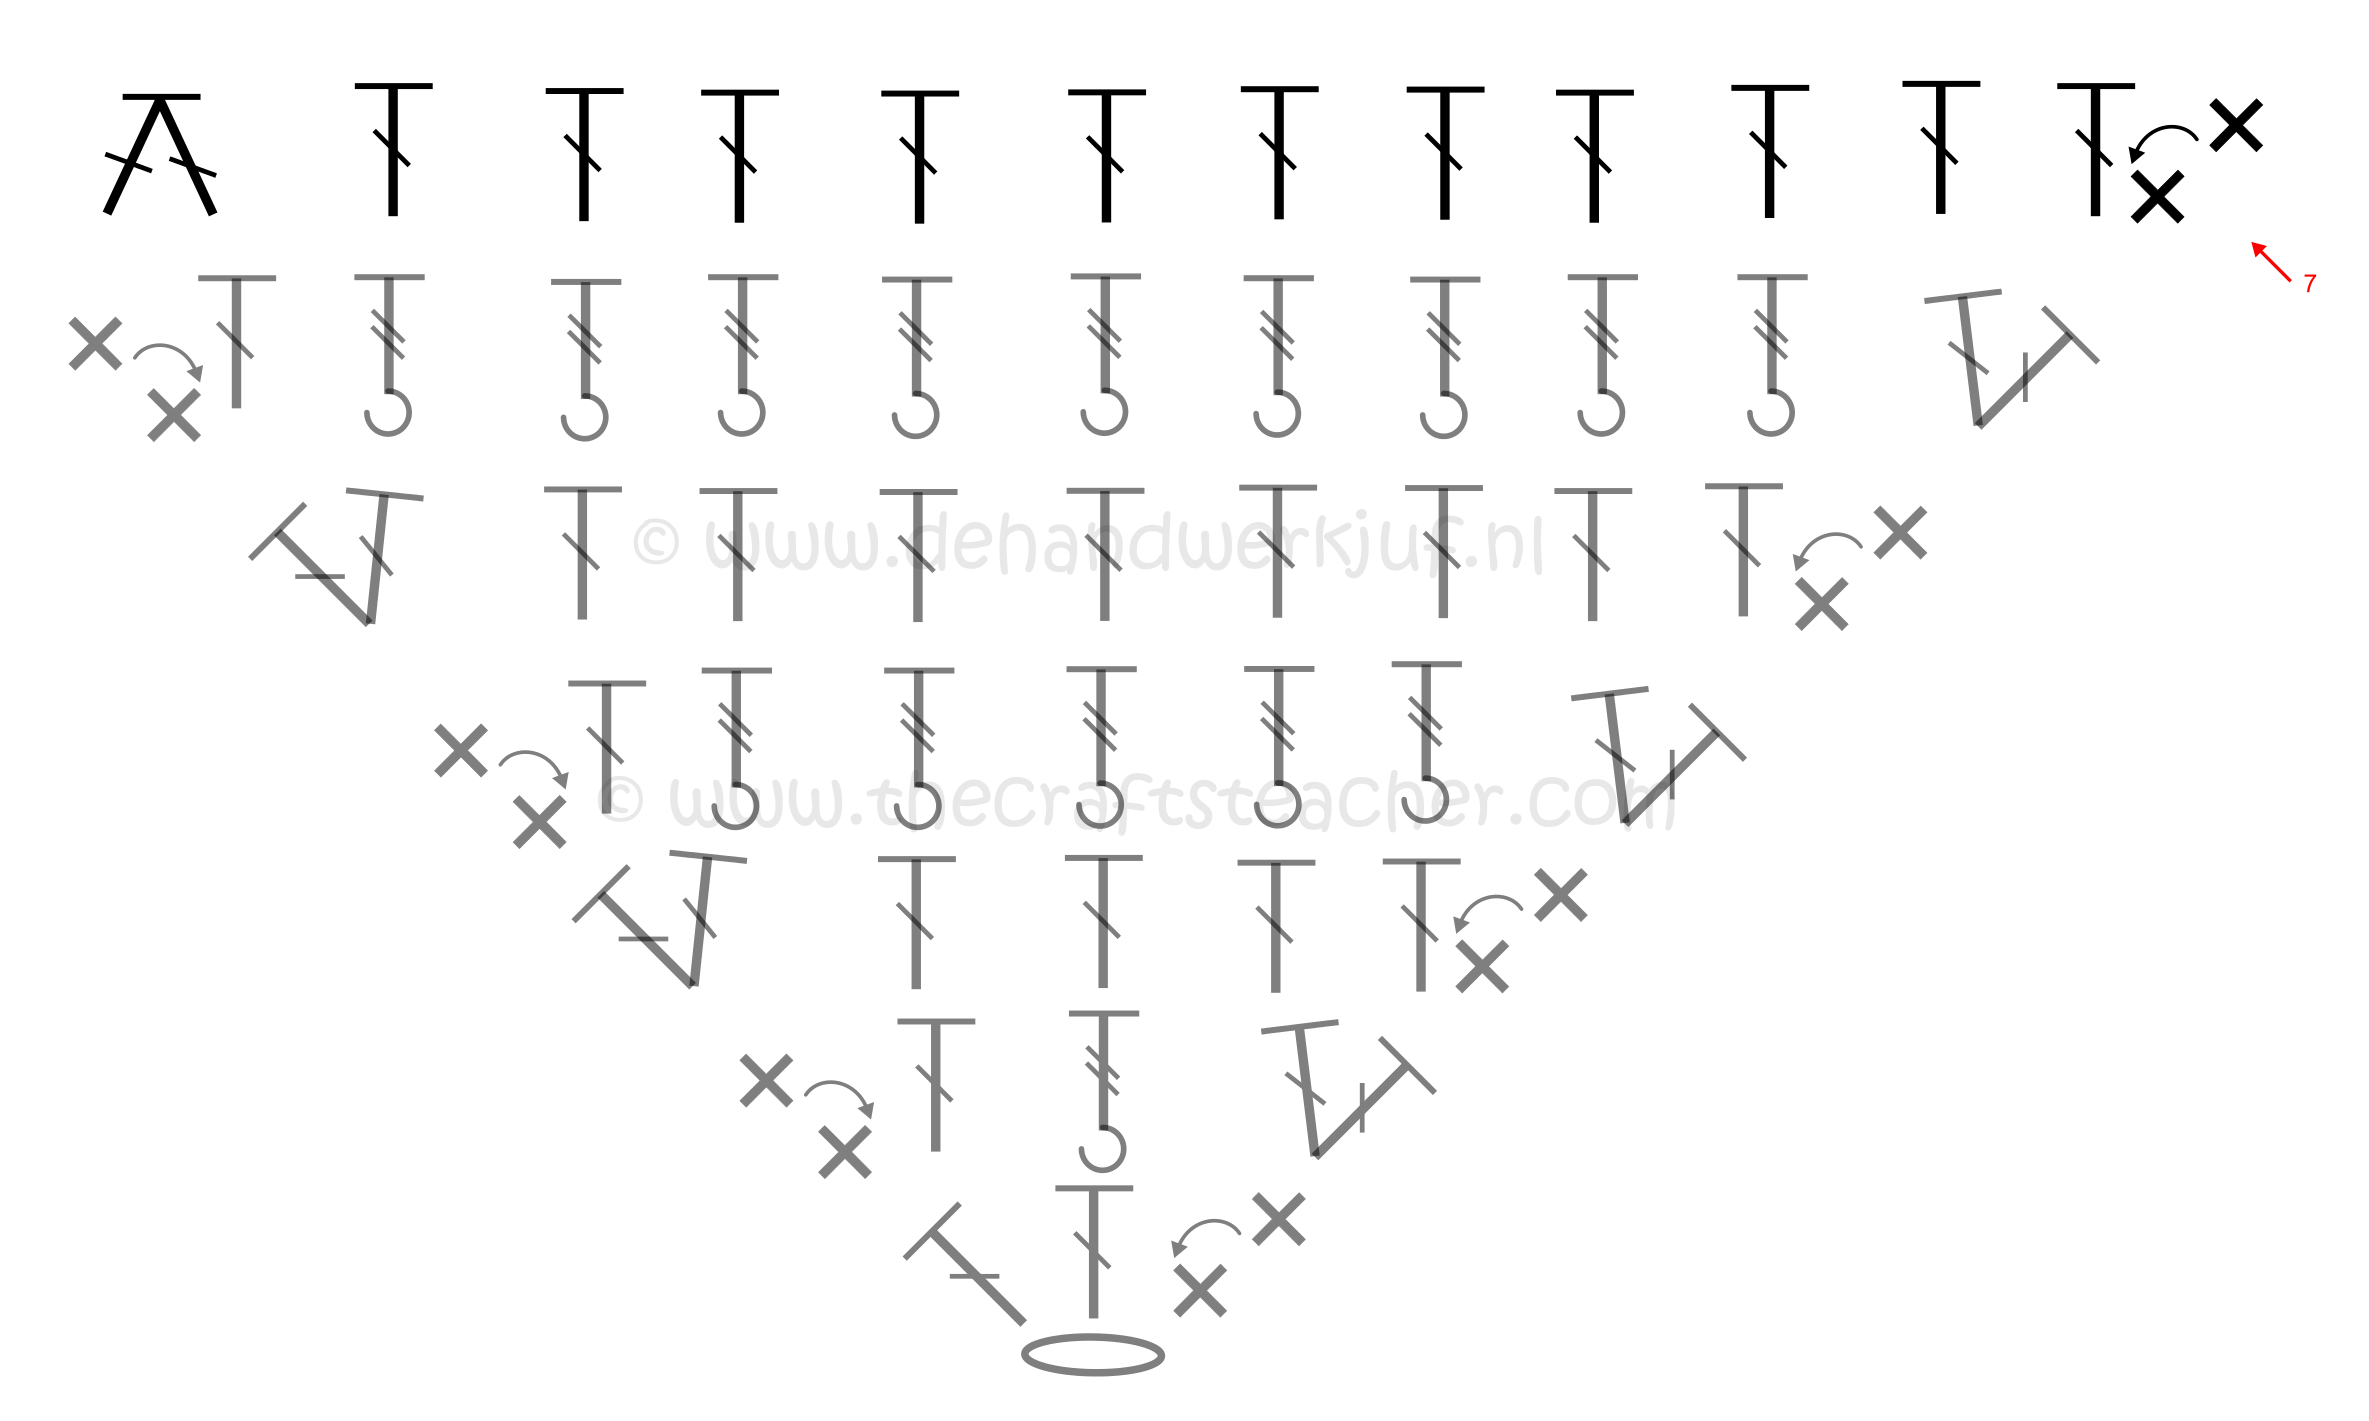
With the rest of the pattern you will do the same as with rows 5 and 6. You make increases at the start and at the end of the row. In the odd rows you will only do double crochets, in the even rows you make front post triple crochets in between the increases. The increases are always double crochets!
Count your number of stitches after each row. You will always have an odd number. With every row you get 2 more stitches.
➡ After row 5 you have 11 stitches, after row 6 you have 13 stitches.
Click on the drawings to see a bigger version.
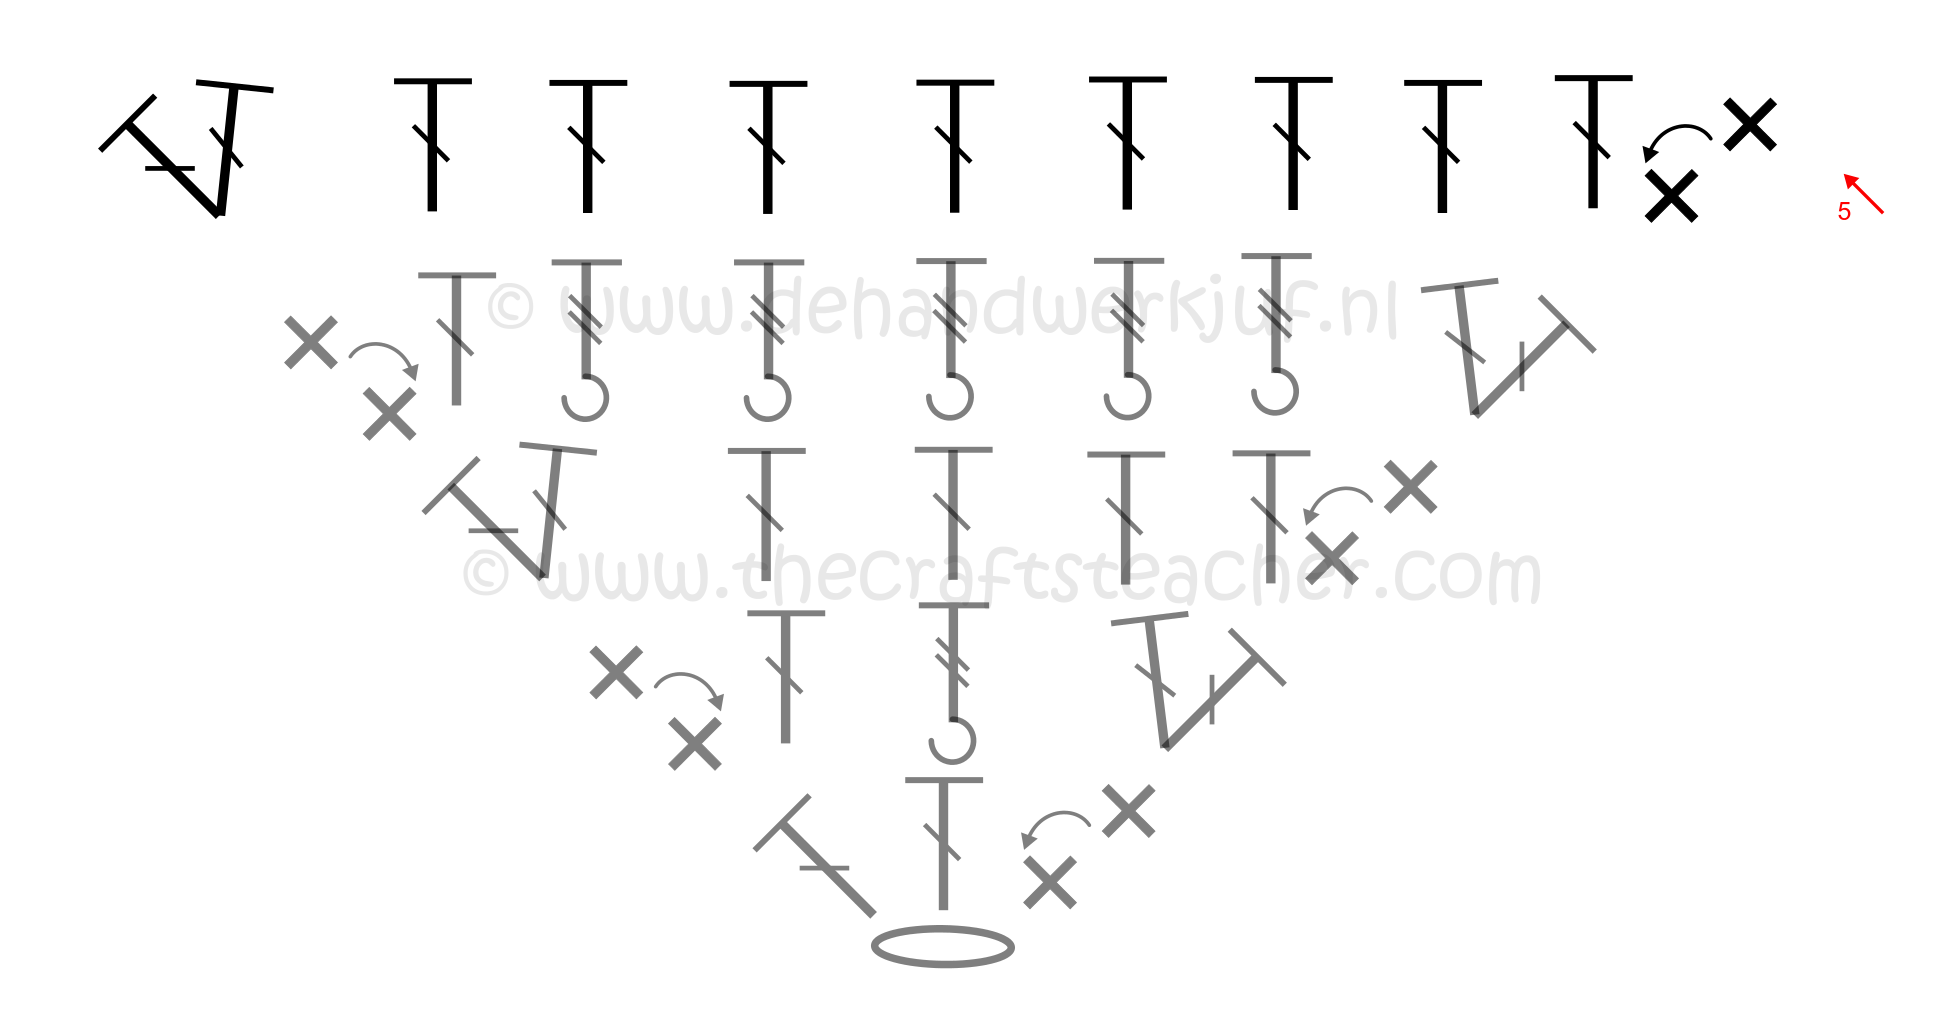
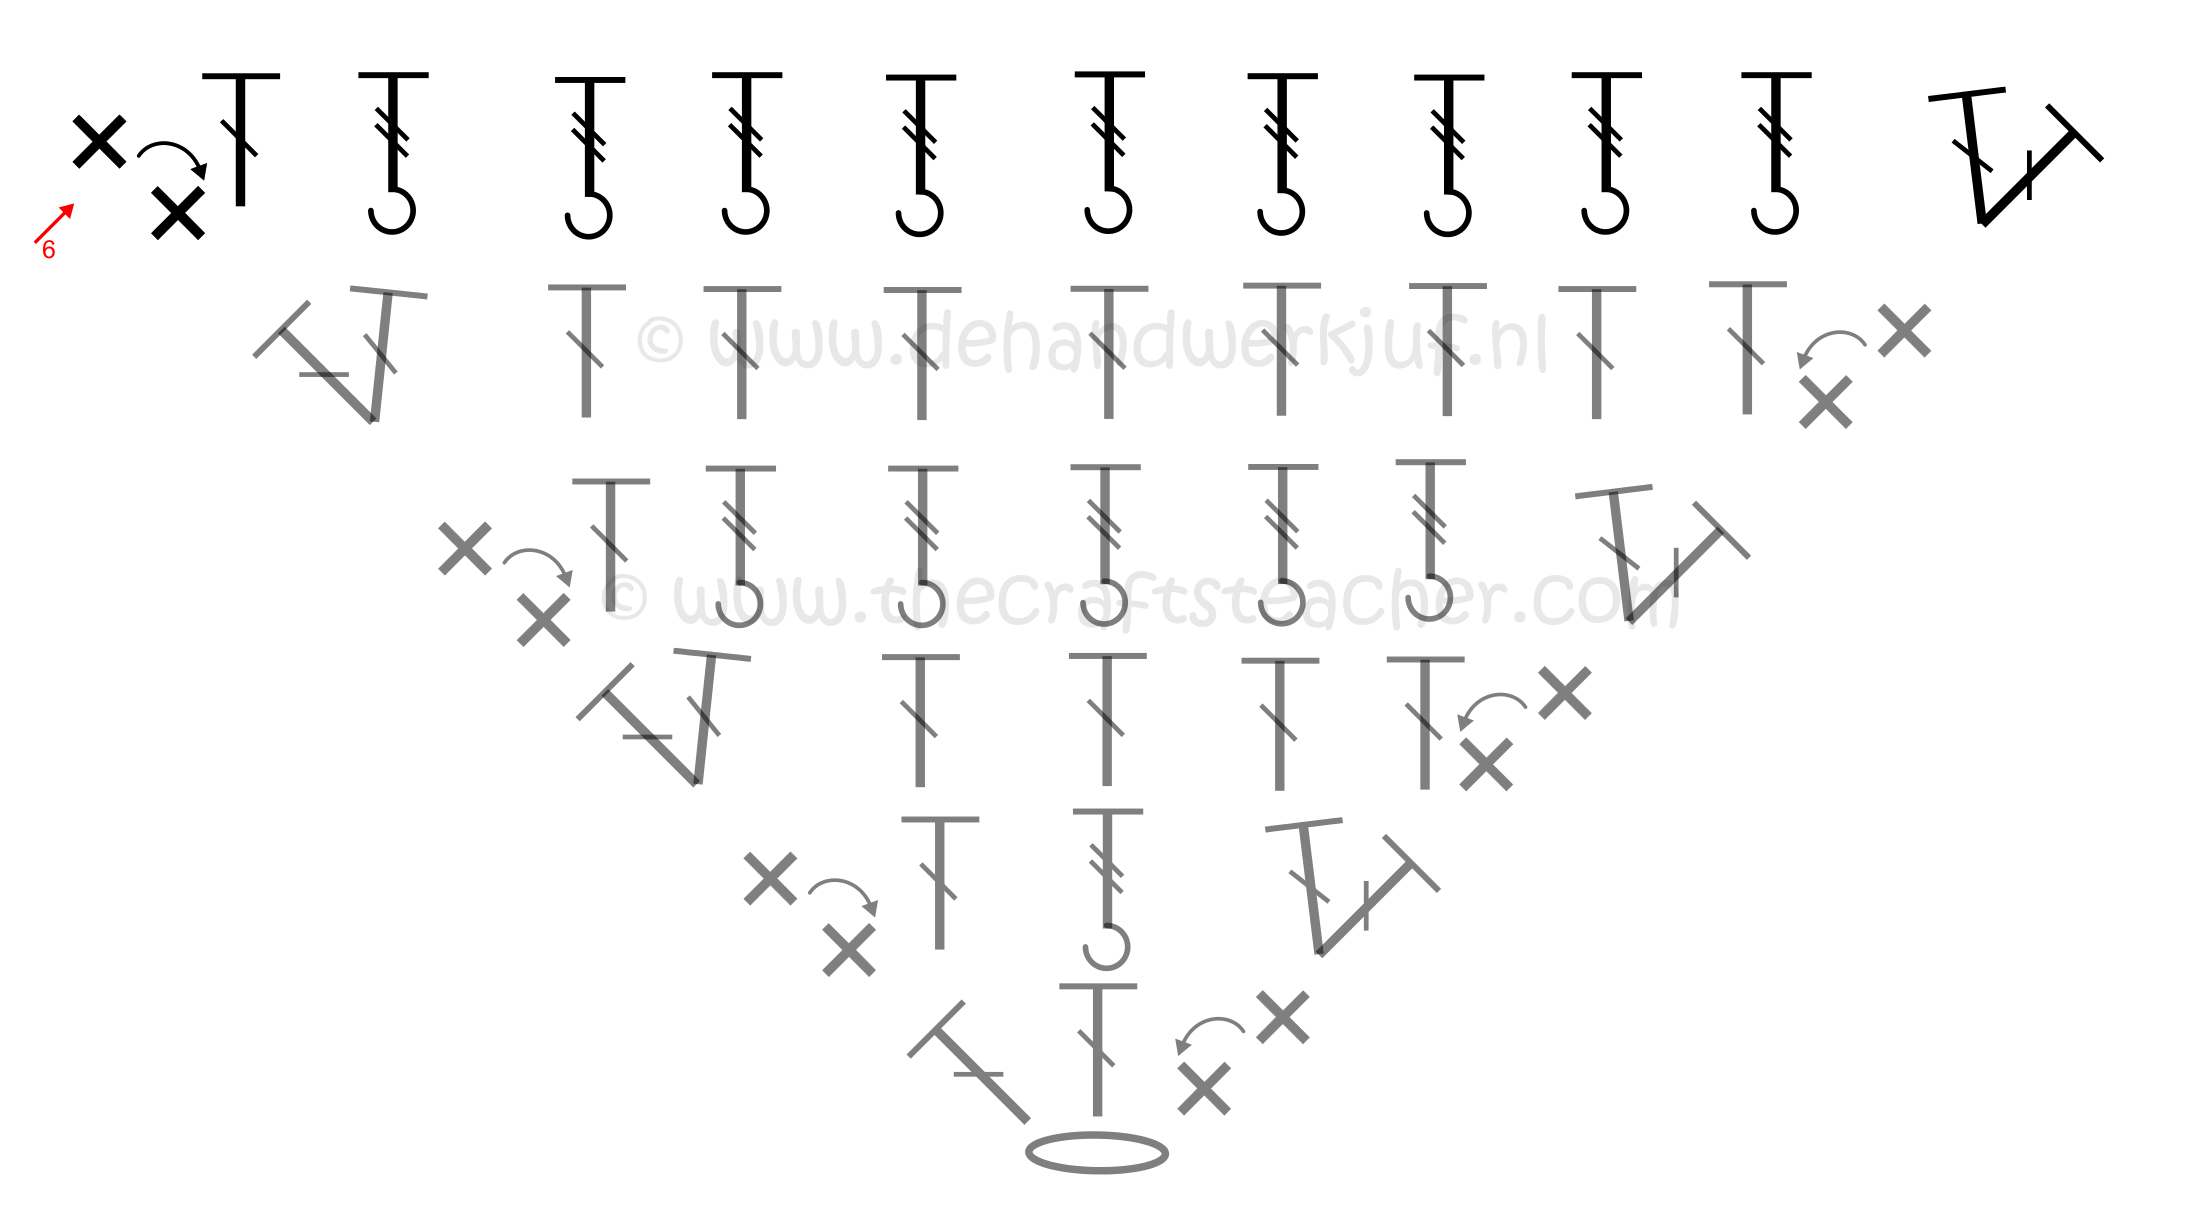
Continue like this until you’ve reached the number of stitches you want. I made 20 rows, and ended up with 41 stitches.
End with an even row before continuing with the next part of the pattern!
An important tip! Weigh your work now! So you will know how much yarn you’ve used for making this point. You have to save the same amount of yarn for making the point of the shawl at the end! This is especially important for this kind of yarn if you want both points to look the same! When working with another yarn, for instance a plain color yarn, this is a bit less important, then it will be just for knowing how much you need for the end, but for this yarn it’s important if you want to make it look nice!
I actually used a bit less then 100 grams for the point, but this also depends of course on how tight you crochet and the size of the point you made.
Part 2
In the second part of the pattern you will make increases at the bottom of the shawl, and decreases at the top. This makes that the number of stitches will stay the same. You will repeat the next 2 rows until the desired length, or until you’ve come to the amount of yarn you need for the end. I saved a little bit extra then I weighed, to have a bit extra for the case your crocheting has become a bit looser along the way.
In the odd rows you will increase 1 stitch at the start and decrease 1 stitch at the end, in the even rows you decrease 1 stitch at the start and increase at the end.
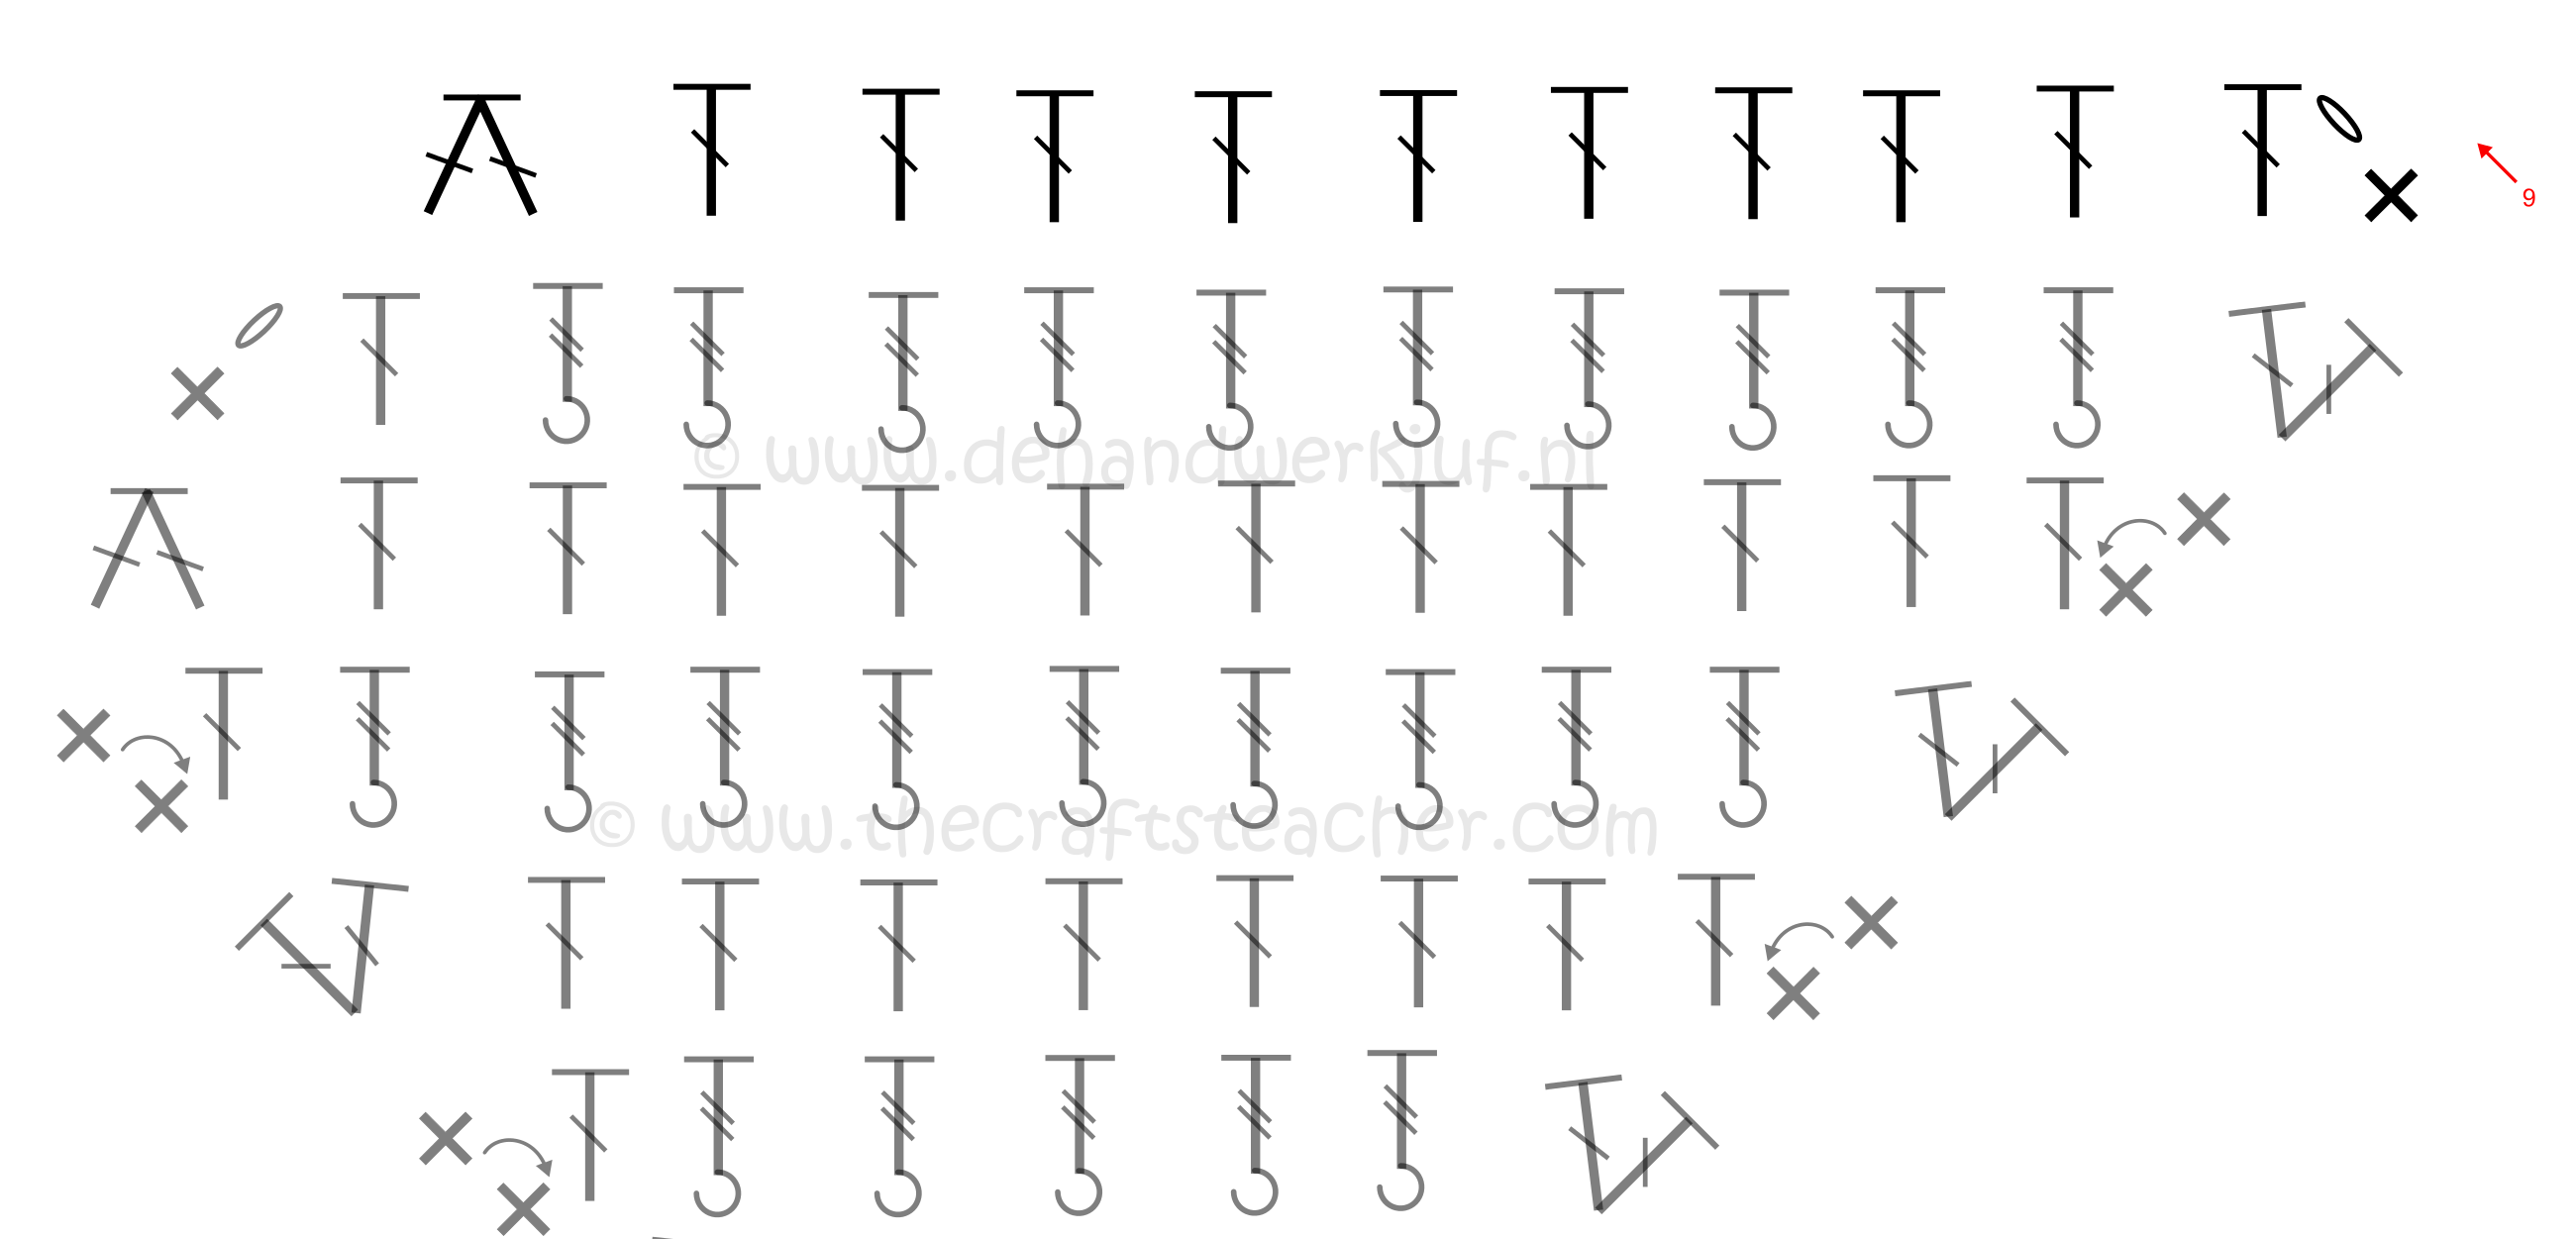
Row 7:
- 1 start dc + 1 dc in the last stitch of the previous row
- Make double crochets until the second last stitch of the previous row. You now have 2 stitches left on the previous row. The stitch with the marker and the stitch before that.
- Crochet 2 double crochets together (dc2tog) in these last 2 stitches of the previous row
➡ You now have the same(!) number of stitches as you had when you ended the previous row. In this example this is 13 stitches.
Row 8:

It is possible that you’ve never seen this way of decreasing a stitch at the start of a row. This is actually a variation on making a double crochet 2 together (dc2tog), but done at the start of a row. It is very simple, but it is very important(!!!) how to do this and how to count this stitch.
- Just start like normaly with the starting double crochet, by making the first single crochet (the first part of this compound stitch) in the last stitch of the previous row (the decrease where you did a dc2tog). Next you will make 1 chain stitch. So do not make the second part of the start double crochet. These stitches do not count as a stitch!!! Now you make a regular double crochet in the next(!) stitch of the previous row. This will count as the 1st stitch of the new row. Mark this stitch! This is really important voor correctly counting your stitches, and to know where the end of the row is when doing your next row.
- Make FPtr’s around the posts of the stitches of the previous row
- 2 dc in the last stitch of the previous row
➡ You still have the same number of stitches, in the example it is 13. If you count from the left side, you will count starting at the first double crochet.
Repeat these 2 rows. Count, count, count, count and count. After each and every row. And use your stitchmarkers to always mark the first stitch of the row! You will always have the same odd number of stitches!
End with an even row.
Part 3
In this last part of the shawl you will make decreases on both sides. You now know how this works at the top side of the shawl, and now you will do this also at the bottom of the shawl. But you do have to pay a little attention there.
Row 9:
- You start by making a decrease at the start of the row by making a single crochet in the last stitch of the previous row, and making a chain stitch. This doesn’t count as a stitch. Make a double crochet in the next stitch. This is the 1st stitch of this row. Mark this stitch!
- Make double crochets until the second last stitch of the previous row. You now have 2 stitches left on the previous row.
- Double crochet 2 together (dc2tog) in the second last and last stitch of the previous row.
➡ You have now decreased 2 stitches, in the example you now have 11 stitches left over. If you count from the right side, you count starting with the 1st double crochet.
Row 10:

- Start this row by making a decrease like you did with the previous row: a single crochet with a chain stitch, and a double crochet in the next stitch. This is the first stitch that you should mark.
- Make FPtr’s. Now really pay attention: take care to leave 2 stitches where you should make a decrease. This is the stitch with the marker in it, plus the stitch before that. Before you know it, you will do 1 FPtr too much!
- Double crochet 2 together (dc2tog) in the second last and last stitch of the previous row
➡ You have now decreased another 2 stitches, in the example you have 9 left. If you count from the left, you start counting from the first double crochet.
Rows 11, 12 and 13
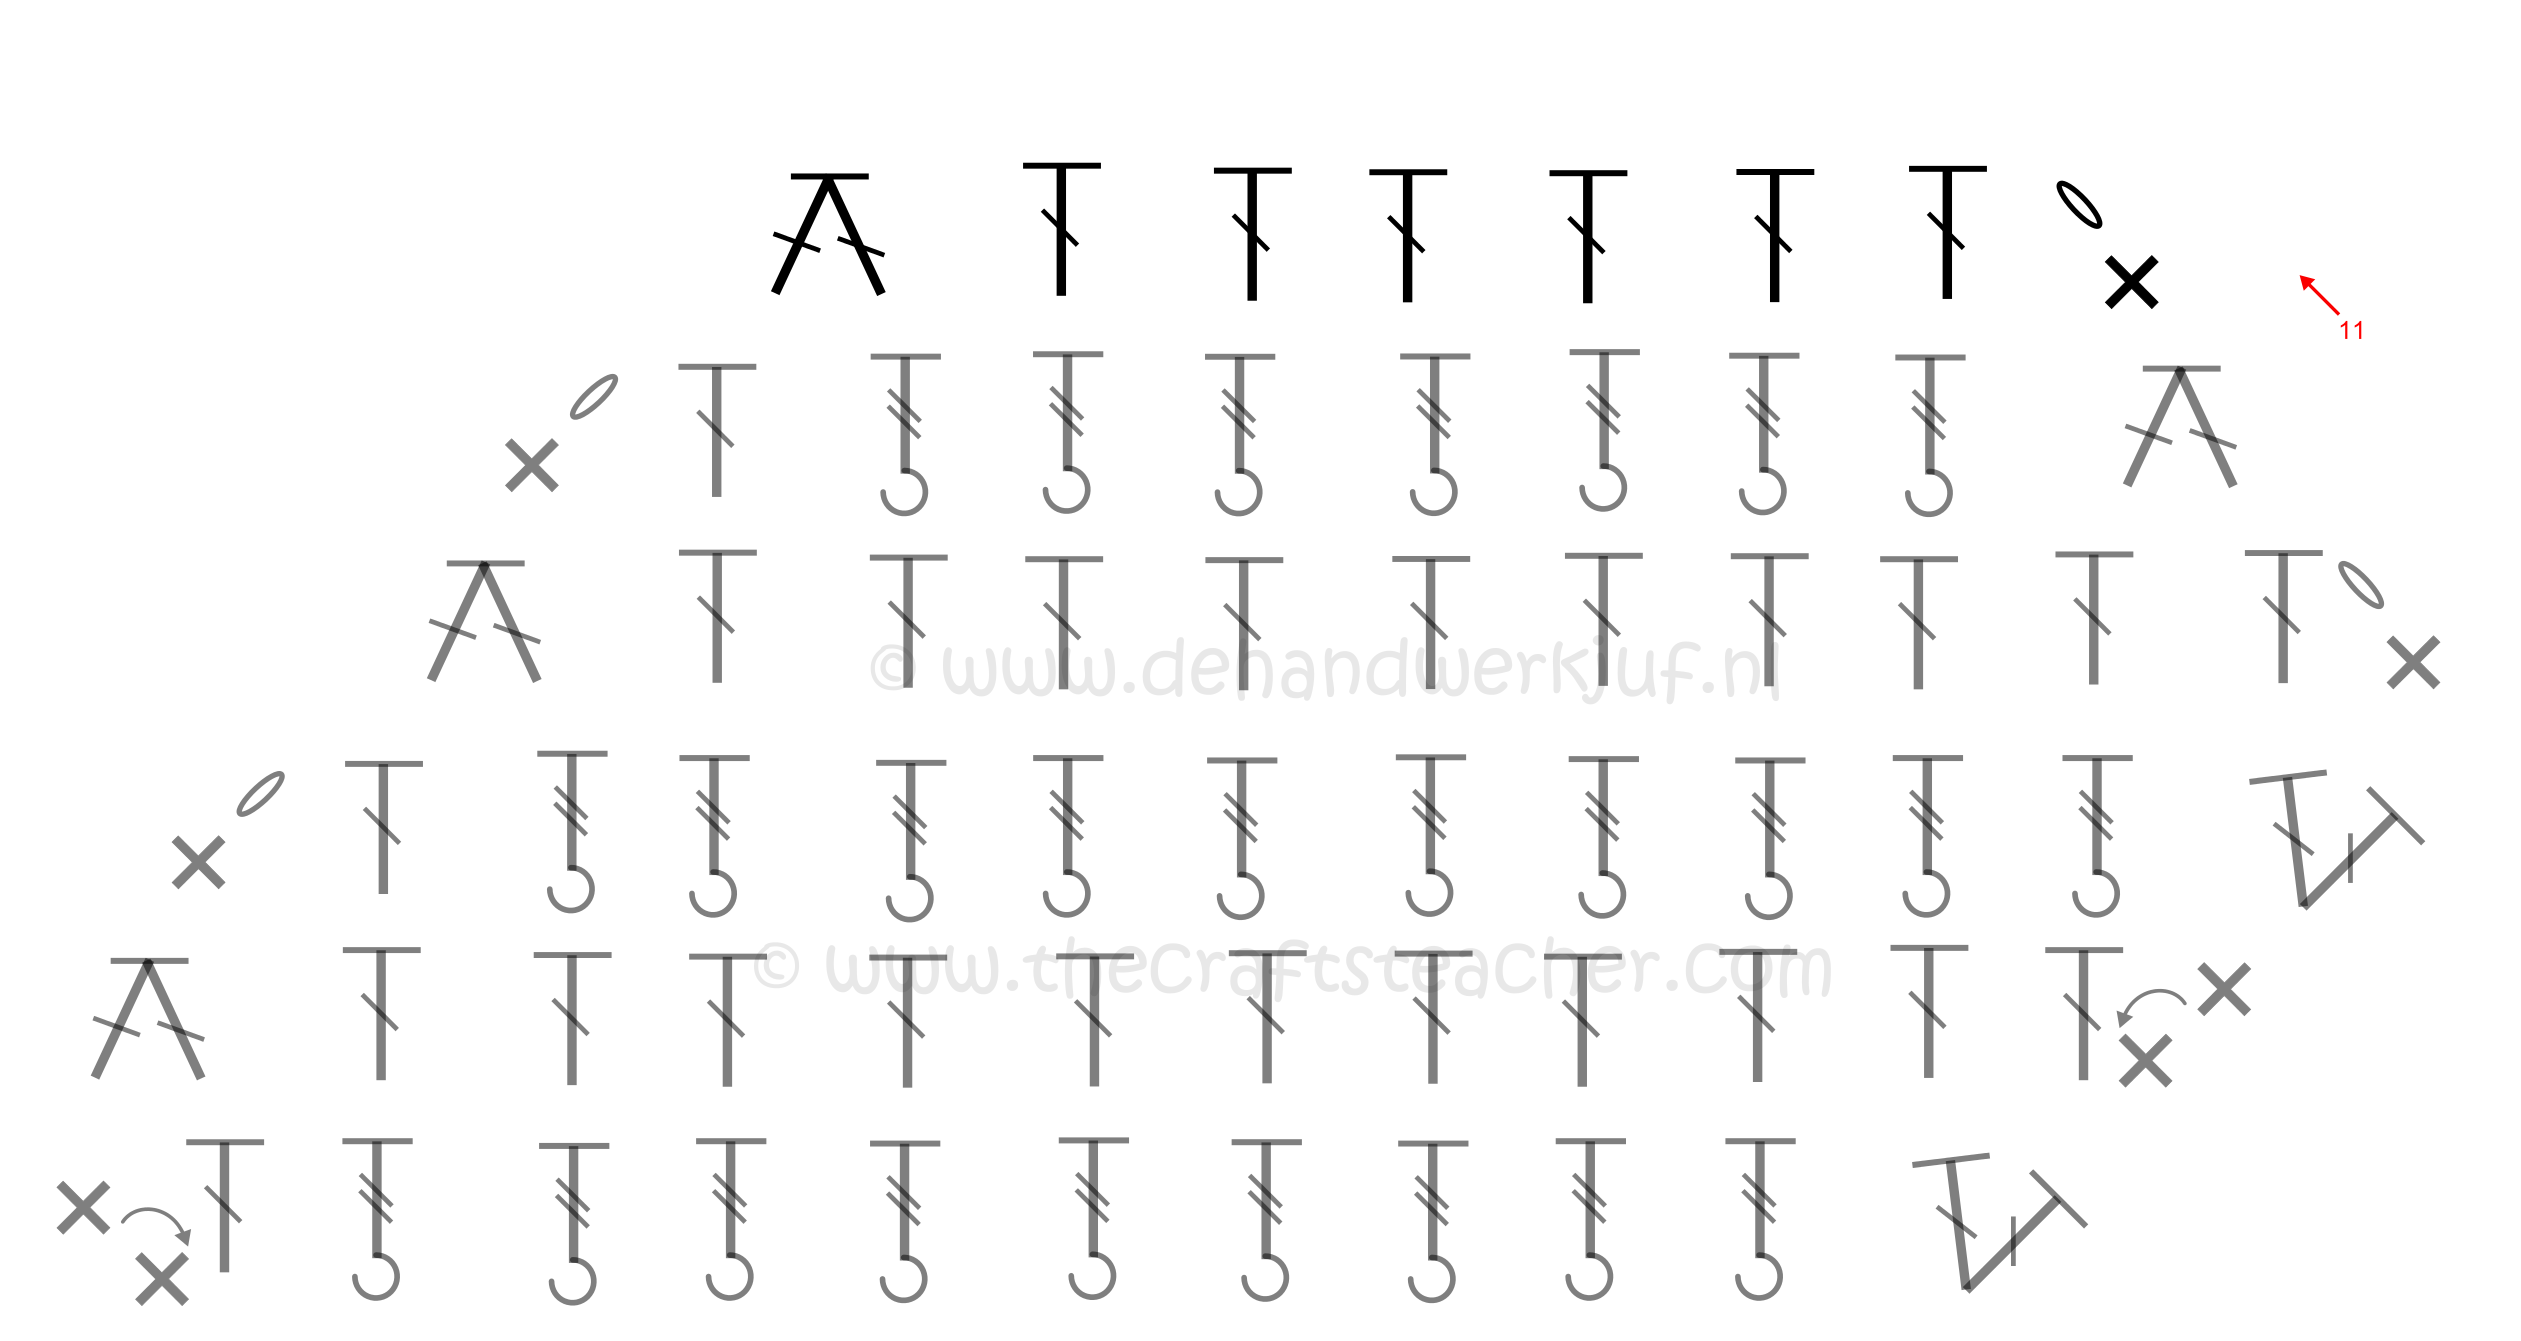
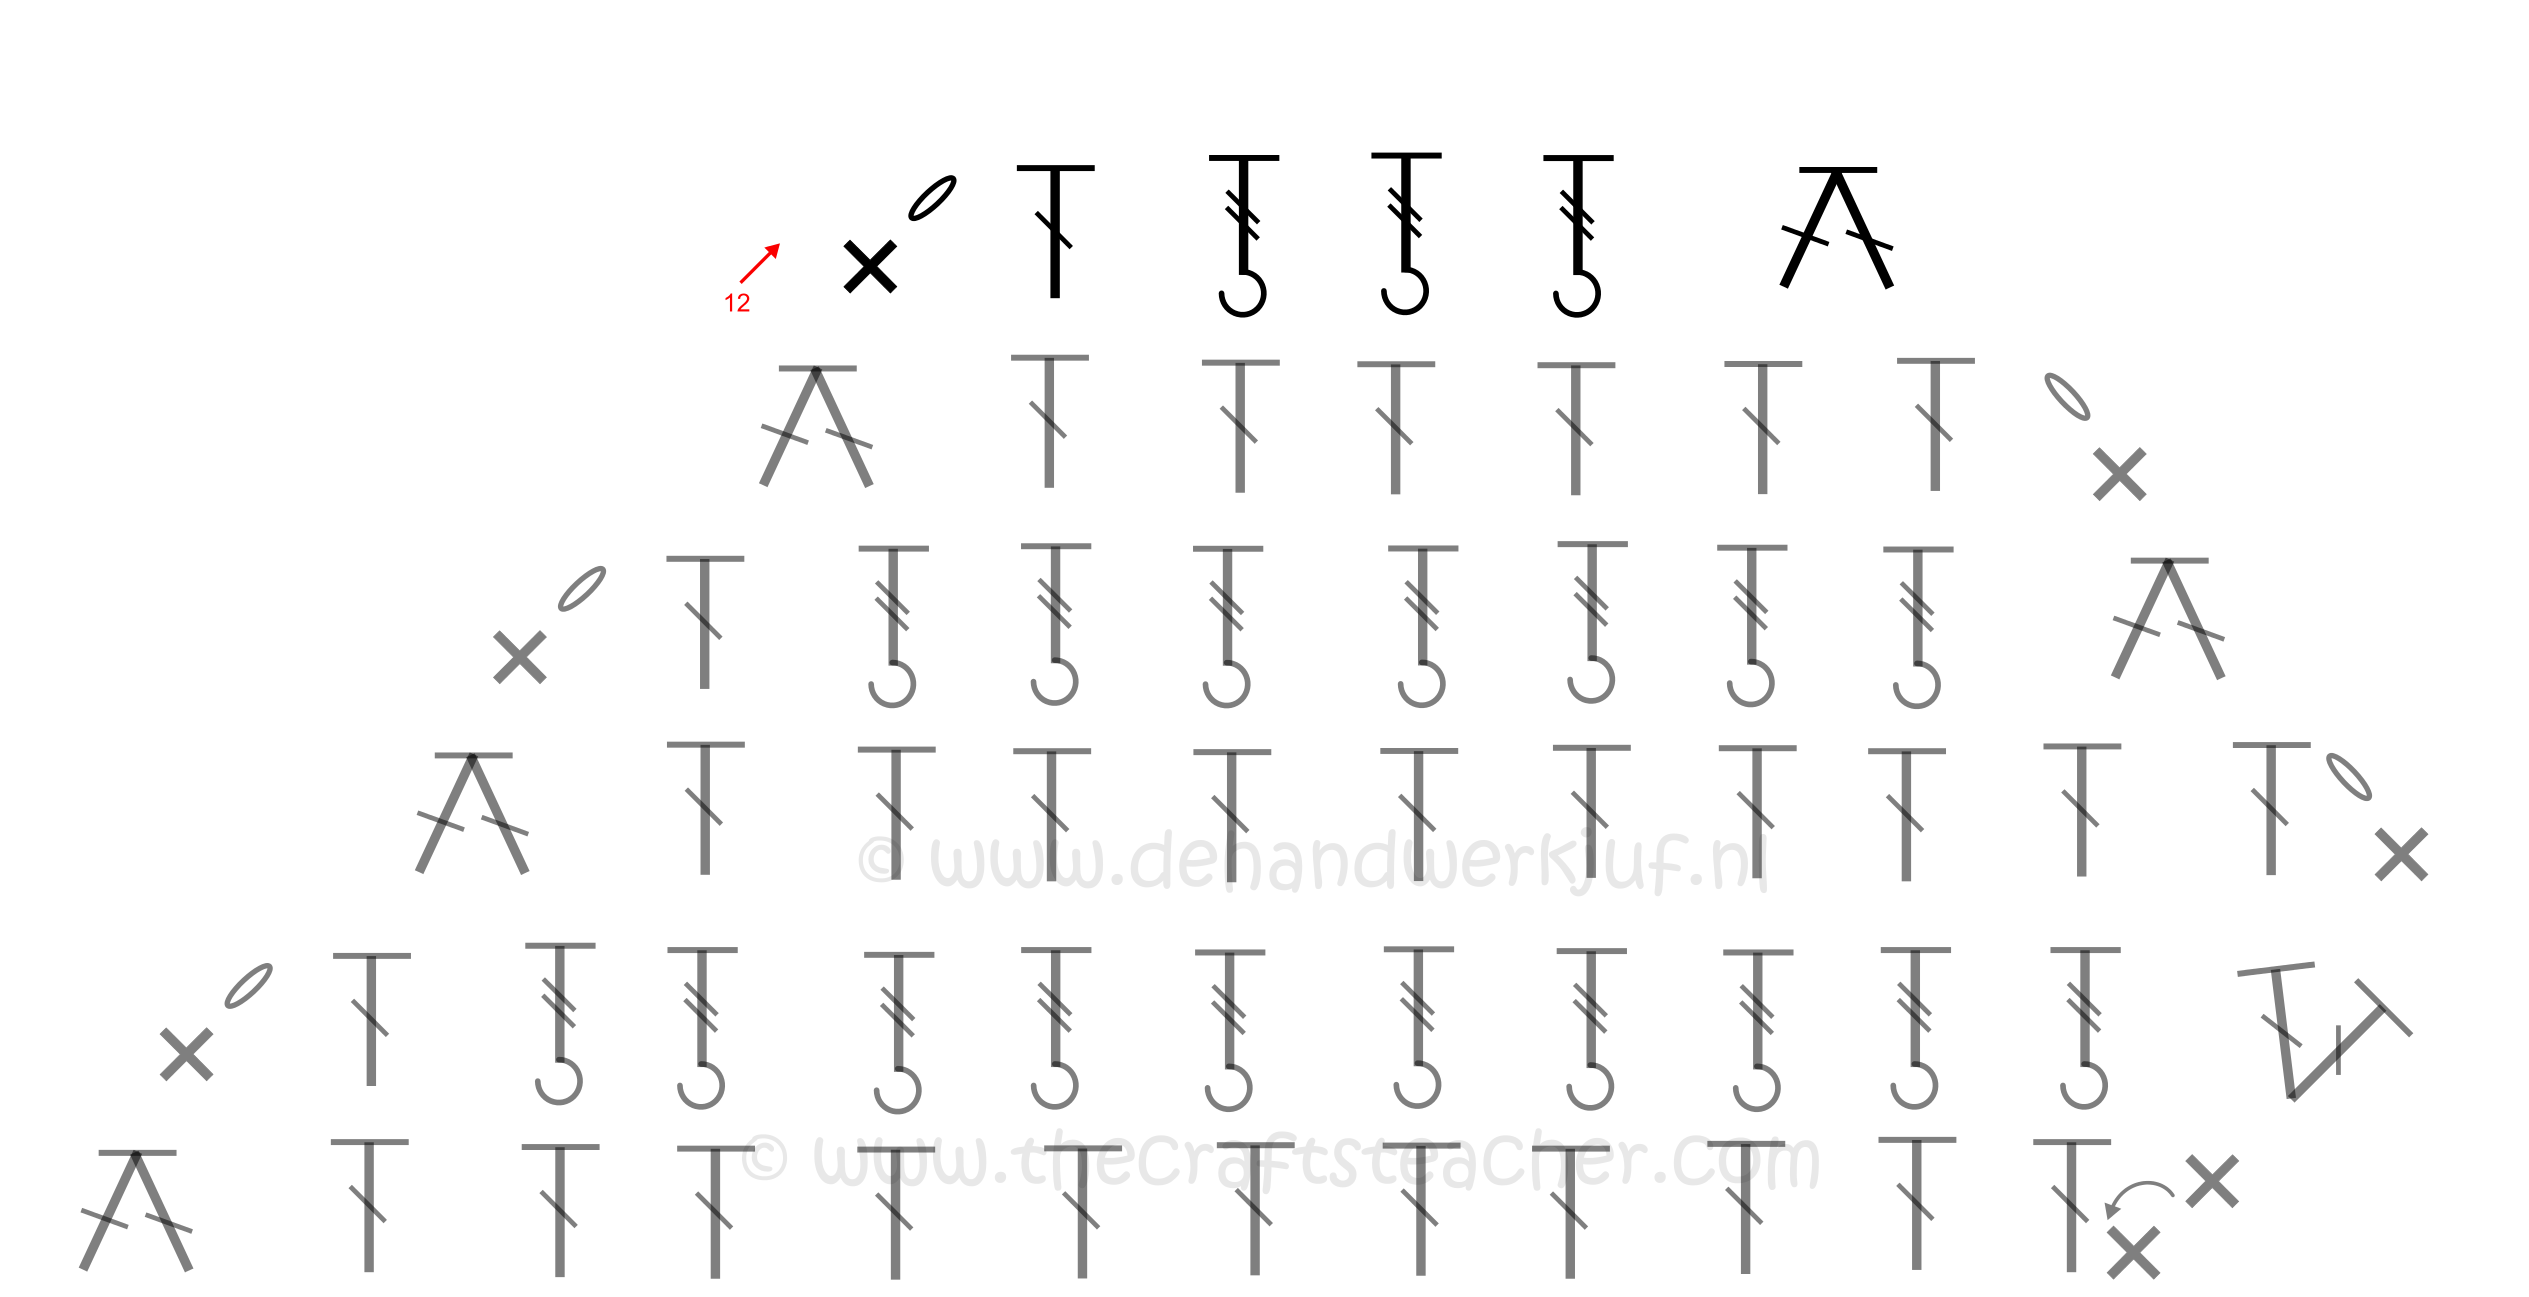
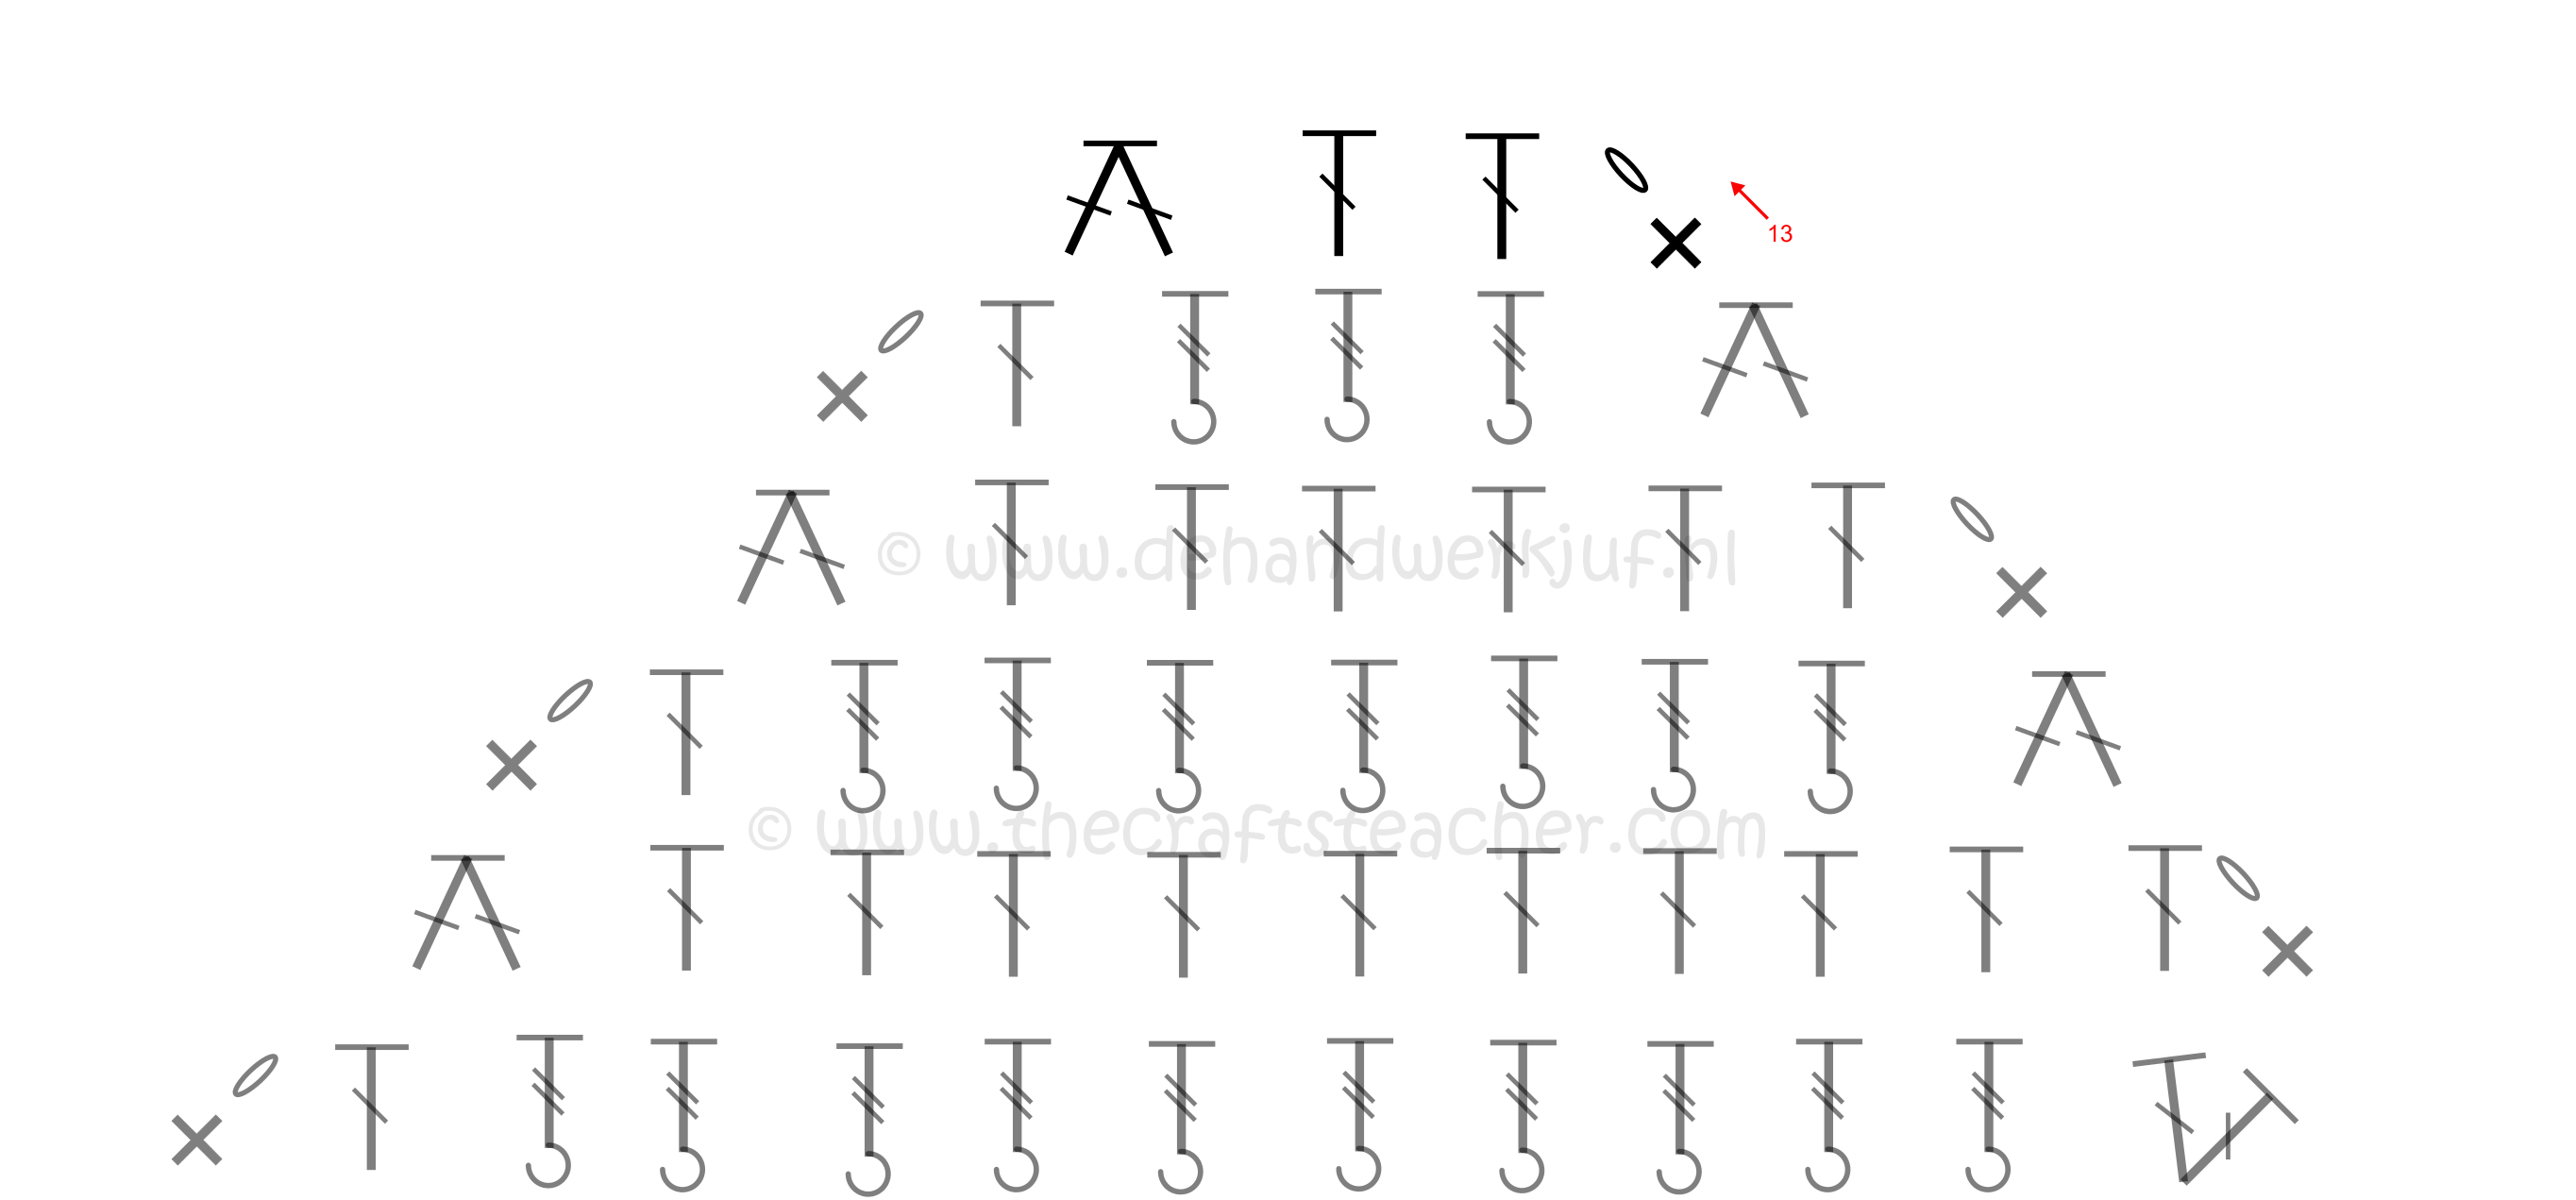
Repeat rows 9 and 10. Here you see how this looks with the next steps. With the last row you only have 3 stitches left.
Row 14:
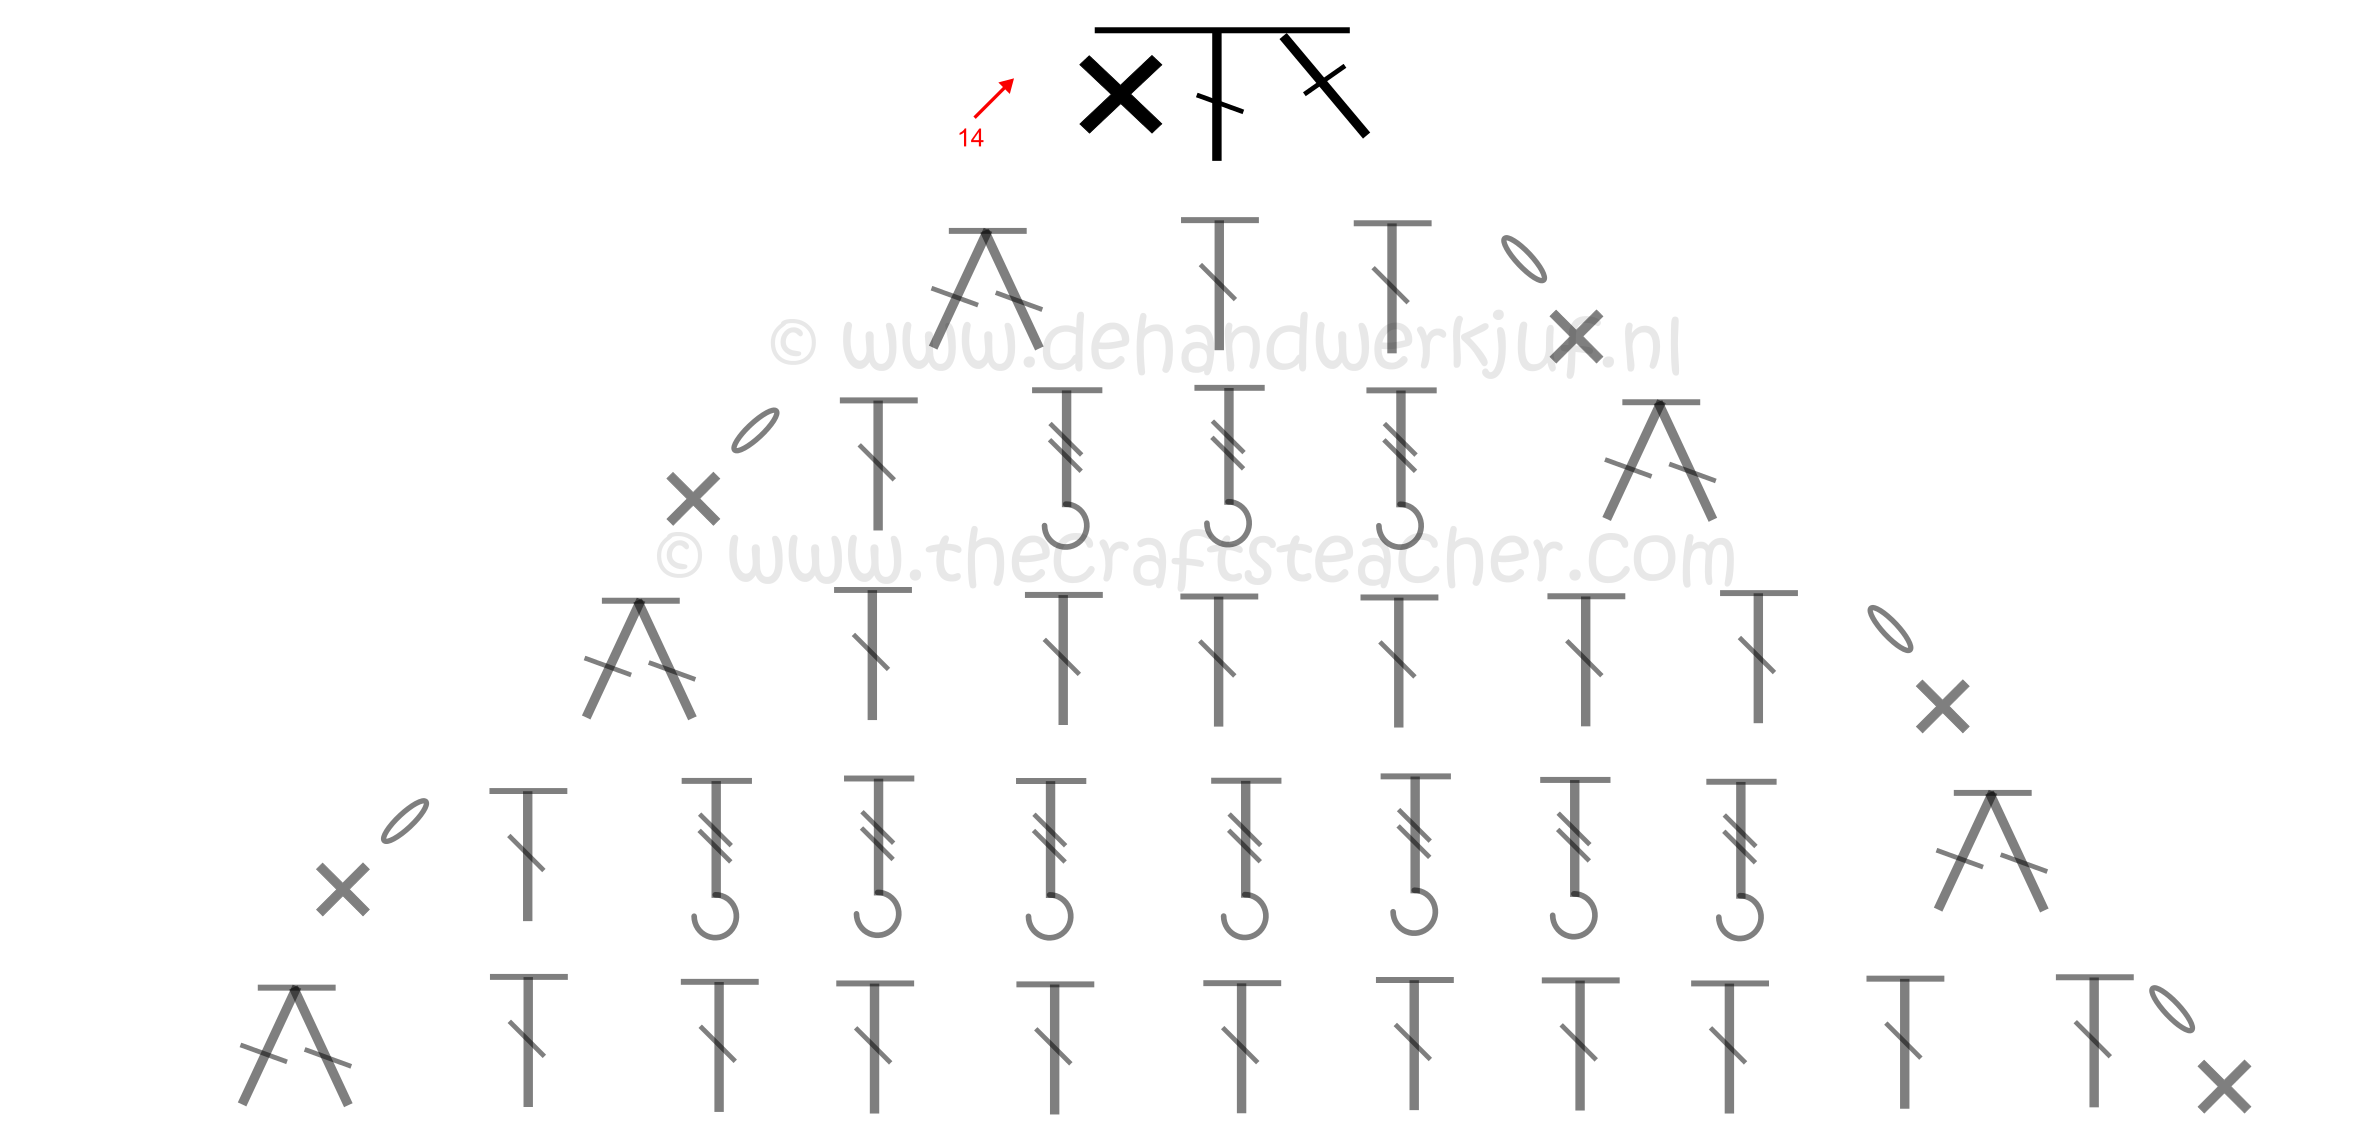
This is the final row. The 3 stitches that are left must be crocheted together. This happens again in a special way. Start with making a single crochet in the last stitch of the previous row. Now make a dc2tog in the last 2 stitches of the previous row, but with the last wrap pull the yarn through the loop of the single crochet also, so that you will end up with only 1 loop on your hook. Cut the yarn off and pull that through one more time through the loop on your hook.
Finishing
Wash the shawl and block it. I used these large foam jigsaw pieces for children, these are cheap and easy to find in a toy store, or use blocking mats especially made for crochet or knitting.
The video’s
I hope the texts and drawings were clear, but you can also see the video’s on YouTube. I will provide the links to the video’s here, but you can also go to YouTube and watch them there. You could subscribe there to my channel, so you will be notified when I have published a new video.
Part 1:
Part 2:
Part 3: